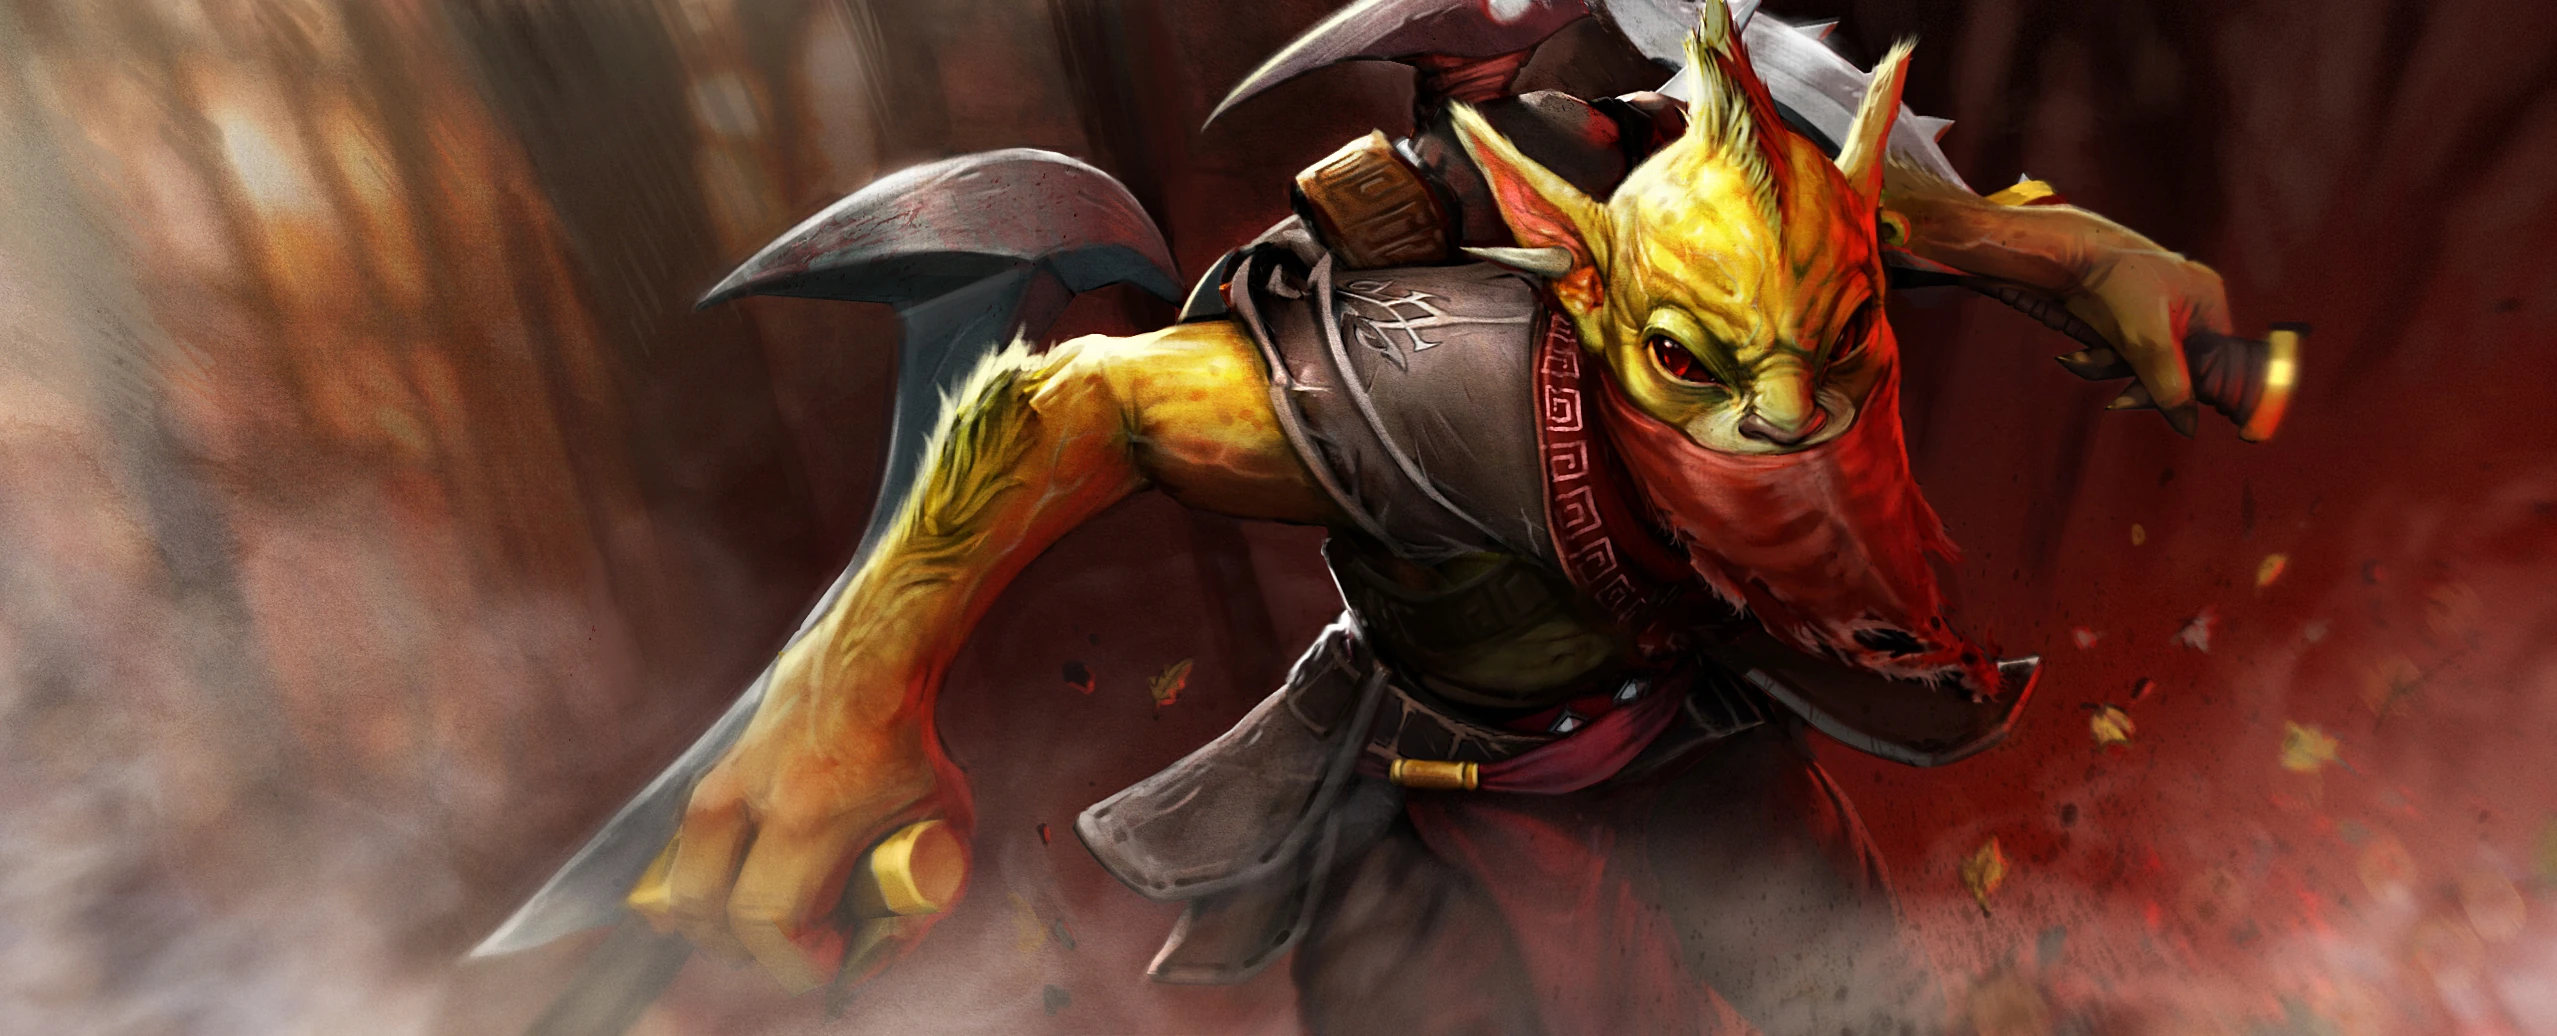
The Hunt is On - A Roamer/Offlaner Guide to Bounty Hunter [6.87 UPDATED]
christhaifood
May 3, 2016
Introduction
Hello everyone! My name is christhaifood, and I am here to share my knowledge and playstyle of  Bounty Hunter to you all. Bounty Hunter is one of my favorite heroes to play, and is a ton of fun once you get the hang of it.
I've noticed that there aren't a lot of guides to Support/Roaming Position 4 Bounty Hunter, a phenomenon that has surged in popularity in pubs in the aftermath of TI5. In this guide, I will provide my insight into this playstyle, as well as the usual pubstomp build most Bounty Hunter players use.
This is my very first guide on dotafire.com, and I hope you guys enjoy it!
UPDATE: I know it's been a really long time since I first wrote this guide in 6.84 or 6.85 or something, but college is hard man.... Anyway, 6.87 is a major patch and I feel that I finally have some side time to update this guide for the patch. Let me know what you think!
Lore
When the hunted tell tales of Gondar the Bounty Hunter, none are sure of which are true. In whispered tones they say he was abandoned as a kit, learning his skill in tracking as a matter of simple survival. Others hear he was an orphan of war, taken in by the great Soruq the Hunter to learn the master’s skill with a blade as they plumbed the dark forests for big game. Still others believe he was a lowly street urchin raised among a guild of cutpurses and thieves, trained in the arts of stealth and misdirection. Around campfires in the wild countryside his quarry speaks the rumors of Gondar’s work, growing ever more fearful: they say it was he who tracked down the tyrant King Goff years after the mad regent went into hiding, delivering his head and scepter as proof. That it was he who infiltrated the rebel camps at Highseat, finally bringing the legendary thief White Cape to be judged for his crimes. And that it was he who ended the career of Soruq the Hunter, condemned as a criminal for killing the Prince’s prized hellkite. The tales of Gondar’s incredible skill stretch on, with each daring feat more unbelievable than the last, each target more elusive. For the right price, the hunted know, anyone can be found. For the right price, even the mightiest may find fear in the shadows.
Overview
Bounty Hunter is a melee agility hero that is very, very flexible hero that can be played pretty much anywhere and whatever role. Bounty Hunter normally takes the roles of either the solo offlaner or roaming support. His skillset allows him to be a very intimidating presence early and mid game, as he can roam and gank very, very effectively. He can easily sneak up on heroes with  Shadow Walk, slow them with
 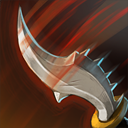 Jinada and
  Orb of Venom, and interrupt
  Town Portal Scroll and deal a lot of burst damage with his
 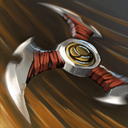 Shuriken Toss.
However, his signature bread-and-butter skill,  Track is what makes Bounty Hunter such a useful asset to his team. It provides true vision of his target, extra movespeed, and most importantly, extra GOLD. This is what allows teams to snowball into a huge gold advantage, putting the enemy at a massive disadvantage.
Pros / Cons
Pros
- Very, very flexible item build
- Can solo offlane or roam support
- Amazing ganker even at level 1/2 (ofc, lvl 1 is harder to pull off)
- Great armor gain
- Can snowball his team with bonus gold from Track
- Counters invisible heroes, like
 Riki and Riki and  Clinkz, as well as Clinkz, as well as  Shadow Blade Shadow Blade
- Basically a counter to most jungle heroes like
 Axe, Axe,  Enigma, and Enigma, and  Legion Commander (bonus if enemy jungler ends up being low on health often) Legion Commander (bonus if enemy jungler ends up being low on health often)
- Interrupts channeling spells and items, notably Town Portal Scroll,
 Black Hole, Black Hole,  Death Ward, and Death Ward, and  Freezing Field Freezing Field
|
|
Cons
|
Skills
Shuriken Toss
|
|
|
|
Type:
Targets:
|
|
|
Active
Enemy Units
|
|
|
Hurls a deadly shuriken at an enemy unit, dealing damage and mini-stunning the target. The shuriken will bounce between any Tracked units who are within a 1200 radius of each other
|
Level
1
2
3
4
|
|
|
Mana
120
130
140
150
|
|
|
Cooldown
10
10
10
10
|
|
|
Range
400
400
400
400
|
|
|
AoE
N/A
N/A
N/A
N/A
|
|
|
Damage
150
225
300
375
|
Notes:
 Black King Bar stops the shuriken from bouncing when hitting a spell immune unit
 Linken's Sphere blocks upon impact as primary or secondary target. When blocked, it stops jumping
- Can be disjointed
- Only bounces to each tracked unit once
TIPS:
- Use shuriken as a finisher when ganking. Either use it to secure kills for yourself or to let the carry get the last hit.
- Remember, you can cancel TPs and channeling ults like Black Hole
- As of patch 6.82, shuriken bounces to nearby tracked heroes. Use this to make some sick plays
by using Shuriken Toss on a creep or random hero to hit a fleeing enemy, in case you can't get in range of directly targeting that enemy.

Jinada
|
|
|
|
Type:
Affects:
|
|
|
Passive
Self
|
|
|
Bounty Hunter plans his next hit, passively adding a critical strike and maim to his next attack
|
Level
1
2
3
4
|
|
|
Cooldown
12
10
8
6
|
|
|
Effects
25% Move Slow, 25 Attack Speed Slow for 3 seconds
25% Move Slow, 25 Attack Speed Slow for 3 seconds
25% Move Slow, 25 Attack Speed Slow for 3 seconds
25% Move Slow, 25 Attack Speed Slow for 3 seconds
|
|
|
Critical Damage
150
175
200
225
|
Tips:
- In conjunction with Orb of Venom and Shadow Walk, this makes Bounty Hunter a very good roamer at just level 2.
- Great for two-shotting squishy supports if you're going for the damage build
Shadow Walk
|
|
|
|
Type:
Affects:
|
|
|
Active
Self
|
|
|
Bounty Hunter becomes invisible and gains the ability to move through other units until he attacks or uses an ability. If he breaks the invisibility with an attack, that attack will deal bonus damage.
|
Level
1
2
3
4
|
|
|
Cooldown
15
15
15
15
|
|
|
Mana
50
50
50
50
|
|
|
Fade Time
1 second
0.75 seconds
0.5 seconds
0.25 seconds
|
|
|
Damage
30
60
90
120
|
|
|
Duration
20
25
30
35
|
Notes:
- Does not interrupt Bounty Hunter's channeling spells upon cast
- The bonus damage is unaffected by Jinada
- During the fade time, Bounty Hunter can cast spells, use items, and attack without breaking the invisibility; those attacks apply the Shadow Walk damage
- Bounty Hunter can pass through other units while invisible
- Bounty Hunter can pick up, drop, or attack items without breaking the invisibility
Tips:
- NEVER break your invisibility if Shadow Walk is on cooldown, unless you are sure the enemy team can't jump on you. You always want to have Shadow Walk off cooldown so you can escape from sticky situations should they occur.
- You can use Shadow Walk while channeling Town Portal Scroll. This way, you can try to fool enemies into thinking you canceled your teleport when you really didn't.
- Don't get cocky. Be mindful if the enemy team has detection or not, and always be careful. The enemy detects Bounty Hunter, he's probably dead.
Track
|
|
|
|
Type:
Affects:
|
|
|
Active
Enemy Heroes
|
|
|
Tracks an enemy hero, giving True Sight of it and grants a gain in movement speed to allies near the hunted. If the target dies, Bounty Hunter and nearby heroes collect a bounty in gold.
|
Level
1
2
3
|
|
|
Cooldown
4
4
4
|
|
|
Mana Cost
50
50
50
|
|
|
Move Speed Bonus
20%
20%
20%
|
|
|
Duration
30
30
30
|
|
|
Bonus Gold
200 for self, 50 for allies
275 for self, 100 for allies
350 for self, 150 for allies
|
Notes:
- Gives True Sight of the target
- Bonus gold ignores whether or not the enemy was denied
- Track can be cast on illusions, but dying illusions don't grant gold
- Allies will only get bonus gold if they're within 900 range of the tracked hero. Bounty Hunter will get the gold regardless of the distance.
- Multiple tracked
 Meepos will grant extra gold, since each Meepo will grant the Track gold.
- The Track debuff is visible to enemies.
Tips:
- ALWAYS spam track whenever you see an enemy. Unless you're right next to multiple enemy heroes. Then you have to judge whether your Shadow Walk is on cooldown, whether they have detection, etc.
- Use this when disengaging. The movespeed bonus from Track makes it very easy to run from fights.

Laning Stage/Early Game
Position 4 Roamer/Support
Starting Items/Explanation

|
|


|
|


|
|
|
- Orb of Venom synergizes very well with your Jinada once you've hit level two, but even without Jinada, the slow is good enough to help you net kills with your allies at level one.
- One Tango and one Clarity is enough for your regen needs. The Clarity helps a lot with spamming your Shadow Walk, which is useful for roaming and camping the enemy's courier (more on that later)
- Get whatever support items need to be bought, whether it's a couple of Observer Wards or the Animal Courier or
 Sentry Ward in case you anticipate the enemy to be using sentries themselves. Sentry Ward in case you anticipate the enemy to be using sentries themselves.
- Close out with Iron Branches, as these provide okay stats and build into your
 Magic Wand Magic Wand
|
Playstyle
As a support/roaming
Bounty Hunter, your job is to be as
disruptive as possible to the enemy team. Your job is not to babysit your carry; your job is to put as much
pressure on the enemy team as possible. At the start of the game,
head to the mid-lane to do one of two things:
- Gank: Or just harass the enemy mid-laner. You do this by using Shadow Walk out of the enemy mid-laner's vision, and wait until an opportune moment to strike. Similar to when you're using
 Smoke of Deceit to gank the mid-laner, you want to approach the mid-lane in a certain pathway as shown below.
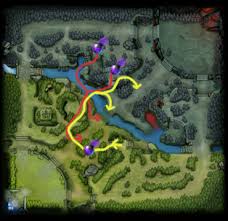
This way, the both the enemy tower and any enemy sentry wards will not have vision of you when you approach until it's too late. DO NOT hit him if he/she is too close to his/her tower. That gank will probably fail, and most likely end up being a waste of time. HOWEVER, if you're absolutely certain the midlane has no sentries in it, you are free to walk right up the midlane and do your thing.
PROTIP: Attack the enemy from behind, and try to bodyblock him inbetween your autoattacks. At level 1 this may be tricky to pull off, but the slow from Orb of Venom and Jinada should make this possible. This just decreases the chance the enemy can run away.
If your invisibility is running out, run up to the high ground on your enemy's side or into the trees in the enemy jungle, meaning if you are on the Radiant team, run up toward the Dire jungle. If you are on the Dire team, run to the Radiant Ancient Camp. Cast Shadow Walk again, and try again.
- Snipe the enemy's courier: Most mid-laners will usually get their
 Bottle at around 2 minutes, so you should camp the enemy mid-lane at around that time. Again, you want to approach the mid-lane as if you were smoke ganking, as shown in the picture above, but instead of hanging in front of the Tier 1 tower, you should move to the high ground between the Tier 1 and Tier 2 Tower. This gives you vision of when the courier passes by.

Again, you want to be spamming Shadow Walk so nobody notices you until their courier is already dead. When the courier finally passes by, just walk up to it and smack it in the face. Waiting patiently for the courier may seem boring (and some really noob mids won't get bottle until 3 minutes or so, UGGHHHH), but the global gold bounty and the possibility of denying a Bottle to the enemy mid-laner is absolutely YUGE.

After all that, you should be in good shape. All you need to do is keep roaming to other lanes and try to gank.
ALWAYS be missing. Instill fear into your enemies (or at least make them waste money buying sentries). If there's an enemy jungler,
BE DISRUPTIVE. Sap the jungler's experience, block camps, and
kill them if they're low on HP. And if you're ever near any of your jungle camps/ancient camp,
do the carry a favor and stack. This will give your carry extra
GOLD, and give you experience you missed out on roaming if you sap that experience. Doing all of this successfully should help you ease into the mid-game smoothly.
Things to Keep in Mind
- Don't underestimate Bounty Hunter's ganking power at levels 1 and 2. Simply sneaking up to the enemy and hitting them will either swing the lane in your favor or outright kill them.
- When ganking mid, go around the long way so that the enemy tower and setnry wards do not spot you.
- Look to kill a Bottle carrying courier at around 2 minutes.
- If there is an enemy jungler, harass and try to kill them. If not, just sap xp and be a huge pain in the ***.
- Just keep roaming, just keep roaming, just keep roaming.
 Solo Offlaner
Starting Items/Explanation
Solo Offlaner
Starting Items/Explanation
Playstyle
Since you're going in the solo offlane, hopefully one of your supports has given you either an
Observer Ward or
Sentry Ward to block their pull camp. Your job in the offlane is to
survive and
get to level 6 fast. To achieve this, do the following:
- Block your creeps after you ward (hopefully). Do your best to bodyblock your creeps as much as possible when they spawn. The closer the creepwave is to your tower, the safer you are, and you can even get some last hits off.
- Stay hidden if your lane ended up pushing to their tower. Hide in the trees to do this. If they don't see you, they can't kill you. Just make sure that you are in experience range, which is around 1300 units from a dying enemy.
- Use Shadow Walk to walk to the enemy's pull camp and sap experience if they are pulling. Do not contest these pulls. You can easily sap free experience off of these pulls.
- Keep your Shadow Walk off cooldown if you show yourself.
- If they have a jungler and the wave is pushed to their tower, go roam for him. You are ahead in levels, and can probably get a kill off the jungler.
- BE MINDFUL. A last hit isn't worth the support disabling you and killing you.
- Pull some jungle camps yourself! The large camps right next to the offlane offer a great way to keep the creep wave near your tower so you can safely gain xp and possibly some last hits.
- If you're feeling particularly ballsy, you can cut the enemy creep wave before they hit the enemy tier 1. Just walk around the lane for as long as possible, and then Shadow Walk back to your tower. This kinda stacks the enemy creep wave to make it push faster so the wave gets to your tower. FREE XP!

Once you get
Track, always carry a
Town Portal Scroll. As a solo offlaner
Bounty Hunter, you have the means to
gank and
countergank. Either sap some more xp in the offlane, or go out and roam for kills.
Things to Keep in Mind
- SURVIVE. DO NOT FEED KILLS TO THE ENEMY.
- Get level 6 FAST so you can start ganking/counterganking ASAP
Mid-Game
Mid-game is where Bounty Hunter really shines. In the many skirmishes that usually occur during this time, Bounty Hunter's team has a significant advantage due to Bounty Hunter's ability to scout out threats/potential ganks and provide a gold advantage.
As such, no matter how you laned Bounty Hunter, his playstyle during the mid-game is the same. Here's how to approach the midgame and help snowball your team to victory.
Playstyle
Bounty Hunter's mid-game is fairly straightforward. Your job is to
get aggressive on the enemy team, and
be involved in as many fights as possible. You are responsible for initiating ganks and communicating with your team if you want to jump on someone.
During the mid-game as
Bounty Hunter, keep these things in mind:
- ALWAYS carry a Town Portal Scroll. Hell, carry two. You need to be in every single fight across the map, and carrying TP scrolls help you get to a fight or counter-gank should one of your cores be in trouble.
- Either buy some Observer Wards or get your team to give some to you, and aggressively ward their jungle. Because of your Shadow Walk, you can safely ward their jungle unnoticed, and can really help in ganking a farming carry in the enemy jungle.
- SPAM Track. Vision is utterly important during the mid-game.
- Be an awesome person and stack camps for your carry while you're roaming the map.
- In a fight, if you get low on HP, DO NOT OUTRIGHT LEAVE THE FIGHT. Rather, get away from the fight, but stick around. Don't get picked off, but at the same time keep spamming Track from outside the fight, and if the fight goes in your favor, jump back in and help your team finish off any fleeing enemies with Track and Shuriken Toss
However, items during the mid-game phase can vary, depending on what build you aimed for early game. You could've gone for a utility
Bounty Hunter or a damage-oriented
Bounty Hunter.
Items - Support/Utility Build
Core Items

|
|

|
|
|
- Arcane Boots allows you to never have to return to base to replenish mana, as you can have significant mana issues running to and fro every single fight on the map and spamming your skills.
- Magic Wand is a MUST on any support. Since you're involved in fights a lot, you'll gain charges fairly quickly. Useful for that small burst heal to survive, or that last little bit of mana to toss Shuriken Toss for the kill.
- Observer and Sentry Wards are also a MUST. Self-explanatory. Get aggressive with these wards
- Town Portal Scroll: NEVER be out of base without one. You need to get to every fight/gank around the map.
- Blight Stone It's a new item! Yay! It's cheap, and a very good early game buy as a roaming support. -2 armor in the early game can make your and your team's autoattacks much more potent. Coupled with Orb of Venom, you can be that much of a better ganker.
 Tome of Knowledge Cuz knowledge is power amirite? If for some reason you've hit 10 minutes into the game and you still don't have your Track, please hope your team allows you to buy this item and use it. Getting your Track ASAP is extremely important. Tome of Knowledge Cuz knowledge is power amirite? If for some reason you've hit 10 minutes into the game and you still don't have your Track, please hope your team allows you to buy this item and use it. Getting your Track ASAP is extremely important.
|
Extensions
You are a rich support, gaining lots of gold from
Track kills. That means you can pretty much buy
ANYTHING that your team needs. YAY! How cool is that?
Bounty Hunter as a support has a very flexible item build, and generally
gets items the team needs. Deciding which items to get though depend on a number of circumstances. Luckily, some items are less situational than others, so let's delve into item choices for
Bounty Hunter.
Common Items:

|
|
Mekansm: Unless you have a natural Mekansm carrier like  Dark Seer or Dark Seer or  Necrophos who can reliably farm it fast, this is your go-to item to get. This item is easy to purchase with its many components and your Track gold, and the heal and aura is soooooo beneficial for your team. I recommend you don't upgrade to Necrophos who can reliably farm it fast, this is your go-to item to get. This item is easy to purchase with its many components and your Track gold, and the heal and aura is soooooo beneficial for your team. I recommend you don't upgrade to  Guardian Greaves until later, since you should be just fine with Arcane Boots and Mekansm. Go use your gold on Guardian Greaves until later, since you should be just fine with Arcane Boots and Mekansm. Go use your gold on  Solar Crest or Solar Crest or  Force Staff or something more impactful. Force Staff or something more impactful.
|
|
|
|
Solar Crest: Another fantastic utility item. Has multiple ways of using depending on the situation. Using it on a poorly positioned ally can help him/her escape or even turn the fight. Casting it on the enemy gives armor reduction and miss chance, helping your allies immensely in fighting an enemy carry.
|

|
|
Urn of Shadows: Since you're going to be in plenty of fights, Urn is a great item for providing both heals for your allies and damage on a fleeing enemy, as you'll hopefully gain lots of charges.
|
Situational Items
|
Dagon |
|
Dagon: Trust me, this is not the item to rush. Only get Dagon if your team is very pick-off and gank oriented. There is a difference between pickoffs and teamfights. Dagon only provides single-target burst, which isn't as useful in teamfights as utiity items like Mekansm and  Pipe of Insight. However, if your team consists of heroes like Pipe of Insight. However, if your team consists of heroes like  Clockwerk, Clockwerk,  Storm Spirit, and Storm Spirit, and  Pudge, who normally pick off lone heroes, Bounty Hunter makes for a great ganking buddy with Dagon. Pudge, who normally pick off lone heroes, Bounty Hunter makes for a great ganking buddy with Dagon.
|
|
|
|
Force Staff: If for some reason you always find either yourself or allies out of position, Force Staff is the tool to get your allies and yourself out of these sticky situations. Likewise, if the enemy carry can be easily kited, like  Sven or Sven or  Ursa, getting Force Staff will make it harder for the enemy carry to reach your allies. Ursa, getting Force Staff will make it harder for the enemy carry to reach your allies.
|

|
|
Scythe of Vyse: More of a late-game item than a mid-game item. This should not be rushed. Reasons for getting this item are obvious, if you need an extra disable for a very powerful enemy carry.
|

|
|
Lotus Orb: PSA: This item's buildup just got a lot easier by using an  Energy Booster instead of a recipe. Because of this, building this from Arcane Boots is completely viable! It's a great dispel for any teammate in trouble, and it gets hilarious when enemies actually cast their spells on someone affected by the item. Energy Booster instead of a recipe. Because of this, building this from Arcane Boots is completely viable! It's a great dispel for any teammate in trouble, and it gets hilarious when enemies actually cast their spells on someone affected by the item.
|

|
|
Glimmer Cape: Obviously moreso for your team than yourself. Extremely rare to get this unless your teammates are complete idiots who'll never stop attempting to f33d.
|
Items - Deleting Squishies Build (Solo Offlane)
Core Items

|
|
|
|

|
|

|
|
|
- Phase Boots provide more damage for your Jinada and chasing power via its active.
- Magic Wand is a MUST. Since you're involved in fights a lot, you'll gain charges fairly quickly. Useful for that small burst heal to survive, or that last little bit of mana to toss Shuriken Toss for the kill.
- Drum of Endurance: Amazing value for its stats. Its stats are comparable to that of an
 Ultimate Orb, and provides a nice movement and attack speed boost. Easily farmed through Track gold, and helps Bounty Hunter snowball through the mid-game phase. Ultimate Orb, and provides a nice movement and attack speed boost. Easily farmed through Track gold, and helps Bounty Hunter snowball through the mid-game phase.
- Poor Man's Shield should've been upgraded from
 Stout Shield during the laning phase. Stout Shield during the laning phase.
- Blight Stone As noted above, great cheap purchase to make your attacks more potent.
- Town Portal Scroll: NEVER be out of base without one. You need to get to every fight/gank around the map.
|
Extensions
Now that you've taken your solo experience and turned that into sweet
Track kills, use that bonus gold for MORE DAMAGE to annihilate more squishies!
Common Items:

|
|
Desolator: Usually your very first damage item. The earlier you get it, the better. Armor reduction and extra damage will make your Jinada hit harder and shred squishies.
|
|
|
|
Black King Bar: Can't get to the squishies because of annoying disables and nukes? Get Black King Bar to take down those heroes without any interruption! Very useful in teamfights, and provides some more damage and survivability too.
|

|
|
Vladmir's Offering: Fantastic team aura, and also simultaneously helps a bit with your own damage too! Sweet!
|

|
|
Sange and Yasha: Always build  Yasha first, as it gives more agility (meaning more damage) and movement speed for chasing. It's always nice to have some stats, and the extra movement speed and maim is very useful for chasing. Yasha first, as it gives more agility (meaning more damage) and movement speed for chasing. It's always nice to have some stats, and the extra movement speed and maim is very useful for chasing.
|
Situational Items
|
Dagon |
|
Dagon: Really for the lolz. More burst couldn't hurt right? However, you should be focusing more on building attack damage items before you ever get this.
|

|
|
Bloodthorn]: SUPER ORCHID!!! Really an ultra-late game luxury item. But hey, [[Phantom Assassin counter!
|
Late Game
So now you've cruised through the mid-game and... WHAT? You haven't ended the game yet??? No worries; even if Bounty Hunter's primetime has passed, he'll still be immensely useful in the late game. How? Pretty much in a similar way to his impact on the mid-game.
That's right, you're pretty much playing like you've always been, except with a little more care, since everyone is at this point fully farmed. Keep in mind:
- You're still spamming Track. Vision is always important, and late-game is no exception.
- Bounty Hunter has the means to scout out any out-of-position heroes. If you catch someone like this, let your team know. If you jump on them and kill, that's a long respawn timer he/she has to wait for, and your team will have a nice window of opportunity to finish the game.
- Save for buyback!!!!!!
- In teamfights, use everything you got. Use all your skills and active items as a utility Bounty Hunter, and hit the squishiest targets as a damage-oriented Bounty Hunter.
Hopefully you win! But if you lose, please be nice. Don't flame, call 'gg', and stay calm. You did your best.


Quick Comment (8) View Comments
You need to log in before commenting.