MadMoose Presents: The Big, Bad, Bounty Hunter
MoosetheMonkey
May 18, 2013
Introduction to the Author
Hey guys(and girls)! My name is MadMoose and this is my first guide ever, so bear with me.
I started original DotA back in 2007 and fell in love with it. That is to say, I played it all day er'day because it was the bee's knees. I played pubs mainly with a friend or two, and some inhouses from time to time.
Eventually, I dropped off the face of the DotAsphere around 2009, around the dawn of the "bot era". It may have had something to do w/ getting banned from DotaCa$h, but my memory is hazy when I think of those times...
Anyhow, I got into League of Legends (LoL) for about a year at the urging of my friends, but 7,000 akali kills and 500 surrenders later, I found myself starting up DOTA 2 for the first time. I haven't been able to put it down since.
Having played on-and-off for about 5 years, I've come to understand the in's and out's of DotA and games similar in nature. As I stated before, this is my first guide for any game/hero and so there are bound to be mistakes that need fixing and gaps that need filling. Be kind enough to point them out to me, and I will gladly correct the errors, wherever they may be. I learned most of the formatting as I went, and it's not exactly where I want it to be, but its passable in my opinion. With that said... let's get started
Storytime
When the hunted tell tales of Gondar the Bounty Hunter, none are sure of which are true. In whispered tones they say he was abandoned as a kit, learning his skill in tracking as a matter of simple survival. Others hear he was an orphan of war, taken in by the great Soruq the Hunter to learn the masters skill with a blade as they plumbed the dark forests for big game. Still others believe he was a lowly street urchin raised among a guild of cutpurses and thieves, trained in the arts of stealth and misdirection. Around campfires in the wild countryside his quarry speaks the rumors of Gondars work, growing ever more fearful: they say it was he who tracked down the tyrant King Goff years after the mad regent went into hiding, delivering his head and scepter as proof. That it was he who infiltrated the rebel camps at Highseat, finally bringing the legendary thief White Cape to be judged for his crimes. And that it was he who ended the career of Soruq the Hunter, condemned as a criminal for killing the Princes prized hellkite. The tales of Gondars incredible skill stretch on, with each daring feat more unbelievable than the last, each target more elusive. For the right price, the hunted know, anyone can be found. For the right price, even the mightiest may find fear in the shadows.
YA HE'S PRETTY MUCH A BOSS. A CAT BOSS. AWW YEEEEAAAA
Pros/Cons
+One of the highest agility/level gains
+Above average base movespeed
+Short frontswing
+Relatively spammable spells
+Item Independent
+Rapid gold gain w/o Farming
+Solid ganker
+Invaluable escape mechanism/skill dodge potential
+Channel spell/teleport cancel
+Item build versatility
+Fear factor
+Cool voice
+Cat (I think)
-Low strength/level gain
-Weak for first few levels
-Snowballing can be countered easily
-Small mana pool
-Outcarried late game
As you can see, the pros that Gondar brings to the table drastically outweigh the cons. One thing to keep in mind, however, is that one con in particular holds much more value than is given by its presence on the list. Gondar's biggest downfall is that he is very susceptible to countering early on, especially in higher levels of play.
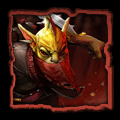
Gondar: At a Glance
What is a Gondar?
Gondar is a versatile, skill-based semi-carry.
What do you mean skill-based?
This means that Gondar is very reliant on his active skills to be effective. Some heros such as
 Drow Ranger
 and Skeleton King play more around their passive abilities. Gondar is not one of those heros.
How is he versatile?
Gondar's kit, meaning his set of abilities, can be utilized to take out an array of enemy heros, not just a single demographic. Likewise, his item build and skill build can be tailored to adapt to countless situations, making him that much more of a threat.
Que es un semi-carry?
A semi-carry is something of a hybrid. It takes on the roles of both hard carries and supports. A semi-carry, by design, is meant to be outclassed by a hard carry during a late game. Whether it be through a skill set, or by stat points, a semi-carry will fall to a proper carry almost every time. What then is the purpose of a semi-carry?
Semi-carries function as catalysts. Their duty to the team is to terrorize. You may be thinking "I ain't an A-rab, I ain't never terrorized nobody damn near my whole life!" Not that kind of terrorist. That would be Goblin Techies. No, a semi-carry must strive to establish a near global presence. This does not mean that you hack the game and jump from point to point at will. Rather, it means that during the initial phase of the game, you must showcase your awesome kitty powers and get into the enemy's head.
Your goal is to get off as many successful ganks as possible. By doing so, you mess with the enemy's mindset and therefore their gameplay. What happens, in theory, is that if you have successfully ganked in other lanes, the enemy will be scared of you. Not just in one lane, but in all three lanes, and in the jungle. The moment someone calls "MIA" on you, the rest of the enemy team is indubitably on edge. This is what I mean by global presence. Enemy heros will be less likely to push, and instead opt to stay near towers or in groups. If played properly, the semi-carry will be suppressing enemy levels, map awareness and farm. This severely limits the mid/late game capability of the enemy, and gives ample time and opportunity for your own carry to farm up his core items.
That being said, semi-carries who get fed enough (get enough kills) have potential to act as carries themselves. Other heros who fit the bill include, but are not limited to:
The Bounty Hunter's Repertoire: Skill Breakdown
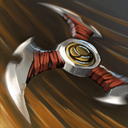 Shuriken Toss
The Bounty Hunter throws a shuriken at a target unit, dealing damage.
Cast Range: 650
Damage: 100 / 200 / 250 / 325
Mana Cost: 90 / 115 / 135 / 155 Cooldown Time: 10.
This is Bounty Hunter's only burst damage skill, and what makes him a viable threat in the early stages of the game. You will notice that the mana cost increase from level 1-2 is 5 more than from 2-3 and 3-4, but the damage increase is a whopping 100, effectively doubling the output. You will level this up at level 2 and level 3, primarily because it allows you to get kills right off the bat, if your lane partner is cooperative.
This skill is maxed as soon as possible, simply because it is most effective early game. A ~300 damage nuke is powerful in smaller fights, but becomes less and less useful as the game progresses. The goal is to use this to facilitate early kills which will allow you to compensate with items and sustained damage later in the game.
What really makes Shuriken Toss shine is the mini-stun that it applies to the target. A mini-stun seems minor, but it has a myriad of applications. Primarily, it functions in cancelling any channeling spells, including teleportation scrolls. Ally is Shackled? Shuriken. Sand King about to ultimate? Shuriken. Enigma's  Black Hole wrecking your team? Shuriken. Enemy carry teleporting to base? Shuriken. I named four examples without even thinking about it. It has great team utility and makes this move impactful in a more dynamic, long-run way.
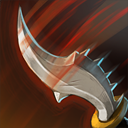 Jinada
Passively adds a critical strike and maim to Bounty Hunter's next attack.
Debbuff duration: 3
Movement Speed Slow: 25%
Critical hit: 1.5x / 1.75x / 2x / 2.25x
Cooldown Time: 12 / 10 / 8 / 6.
Jinada helps Bounty Hunter maintain his bursting/assassinating capability when the damage of Shuriken Toss begins to falter. It applies a 25% slow for 3 seconds, and critically strikes. It complements your ultimate very well, because as you are speeded up, the enemy is slowed.
The critical strike also synergizes well with your ultimate, because critical strikes are amplified by reduced armor.
I get one level of this at level 4 because it will greatly impact your killing/chasing potential in the early game. The debate here is why not get more levels earlier on. I prefer to level up Jinada after Shuriken, simply because the cooldown time is a non-factor at early levels. Getting a level 2 or 3 Jinada early on is pointless in a practical sense. The extra critical percentage wont be noticeable with such low base damage, and the slow is the same at all levels. Especially before a tower has gone down, the chances of chasing someone for more than 5-6 seconds are very small. Either the target will have been killed, or both teams will have retreated.
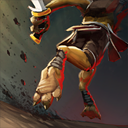
 Shadow Walk
Temporary invisibility, with a bonus for backstab damage. Improving the ability makes transitions quicker.
Casting Range: N/A
Area: N/A
Duration: 15 / 20 / 25 / 30
Backstab Damage: 30 / 60 / 90 / 120
Mana Cost: 50 Cooldown Time: 15
This move is Bounty Hunter's go-to. Just as Storm Spirit has  Ball Lightning, so does Bounty Hunter have Shadow Walk. This skill is immeasurably useful, and Bounty Hunter's playstyle is based around it.
I prefer to pick up 2 points of Shadow Walk instead of 1, before level 6. This is just a personal preference really. I get antsy with Shadow Walk level 1, simply because I know that I will be visible for a moment as my skill comes off cooldown. Having those extra 5 seconds of invisibility can help you slip past an enemy ward to gank, or keep you from appearing in the midst of the enemy without your invisibility off cooldown. Also, I find that the 30 extra backstab damage is more useful than the extra 25% critical strike from Jinada. Certainly this is up to the player's preference. Do what feels right for the situation.
As with most skills, there is a built-in counter. Sentry wards, Dust of Appearance and Gem of True Sight are your kryptonite. In public games, most often, there is very little synergy between teammates and it will take them a while before getting one of these revealing items, by which point you should already be dominating. In higher levels of play, though, teams are likely to have Sentries and Dust as early as the beginning of the game. Overconfidence is very common when playing with a skill like this, and a good Bounty Hunter will judge the opponents skill level and scout out his items before engaging in any skirmishes. Make sure the opponent does not have a true sight item, or make sure that you have an ally who can help you escape if you are visible.
A very important tip to remember about this move is that, like other invisibility skills, Shadow Walk allows you to dodge incoming abilities and incoming attacks with proper timing. However, the fade time for Bounty Hunter is slightly more than other invisibilities, and so requires more acute timing when attempting to dodge. Take for example a  Magic Missile from Vengeful Spirit. Activating the skill just as the Missile is launched will result in a dodge. Similarly, if you just finished up a gank and the tower is hitting you, activate Shadow Walk when the orb is about .5-1 second away from hitting you. Again, this requires a good amount of in-game practice to really understand and learn, but don't be afraid to try it or you will never pick up this invaluable skill. Once you get the hang of it, Shadow Walk will annoy the hell out of opponents, simply because you can dodge a large variety of spells with the click of a button.
Note: Dodging will not work if the enemy can see you while invisible (sentry wards, dust, gem, etc.)
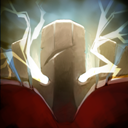
 Track
Track
Tracks an enemy hero giving true sight of the target, reducing their armor by 1 / 3 / 5 and grants a 20% movement speed to allies near the hunted. If the target dies, Bounty Hunter and nearby heroes collect a bounty of 75 / 150 / 225 gold.
Area: 900 / 1050 / 1200
Duration: 30
Mana Cost: 70 / 60 / 50 Cooldown Time: 10 / 7 / 5
Ah. Ah. Aaah. Oh yeah. Yeah, work it. Oh yeah. Ah, aaaaaaaah. Aaaaaaaaaaaawwwww YEAAAAAAAAAAAAH BABY. That's what I'm talking about.
This is Bounty Hunter's bread-and-butter skill, as they say. It is what puts him above other semi-carries and gankers. It elevates him above other heros because it makes him the most efficient ganker. It's a basic concept of economics: the opportunity cost. What you lose by making a decision. The opportunity cost of ganking is the loss of farm, gold and exp.
With ganking, the deterrent is always that you will be losing farm time, and there is no guarantee of a kill, for that matter. Track solves all of your problems.
First, the movespeed buff. Oftentimes, enemies will get away because they bought boots, or they have just a bit more base speed than you. The 20% movespeed bonus applies to ALL of your teammates, not just yourself, so it transforms them into a gung-ho ganking mob that strikes fear in the hearts of the likes of Sniper and Crystal Maiden.
Second, the armor debuff. This will really help you rip into squishy heros who have low armor early game, greatly increasing your damage input. It also makes high armor heros like Dragon Knight more gankable early on in the game.
Third, the true sight/vision factor. This component gives you visibility of the target, EVEN WHEN THEY ARE INVISIBLE. Otherwise ungankable heros become fodder for you and your teammates. Vision is also beneficial even if the hero is not invisibile. The enhanced vision will make it nearly impossible for your enemy to juke in and out of trees and up hills, because you can see them at all times.
Fourth, the ridiculously short cooldown. At level 16, the cooldown is a tiny 5 seconds. In a teamfight scenario, you will track 1 or 2 of the enemies before the fight begins and then the other 3 or 4 during the course of the battle. This means that your team will have a slight armor advantage throughout, and also a much better picture of the enemy team and their positioning.
Last, but definitely not least, the bounty gold component. Bounty Hunter's trademark. What is a kill without a prize? This move guarantees that every gank that you successfully execute will pay off, whether you or your ally got the kill. At level 16, you get 225 gold for every hero killed while tracked. If you get a kill yourself, you are essentially doubling your gold output. Even in a situation where you and your enemy killed each other you still get more gold! The bounty component makes you the most efficient ganker because if you help your team get the same number of kills that the enemy ganker does, you win what would otherwise be a draw, because of your gold advantage.
Obviously, this skill needs to be leveled up every time it is available. If it isn't you're losing out on a hell of a lot of booty. Argh =/
The Bounty Hunter's Armory: Item Breakdown
This is by far the most versatile aspect of Bounty Hunter, in my opinion, as any set of items can yield great results. A good Bounty Hunter player, and a good DOTA 2 player in general has to understand the enemy team composition and adapt accordingly.
Note: I have THREE builds that I tend to use, and they are all outlined at the top of the page, so make sure to check them out!
There are 3 roles that I find Bounty Hunter can fit into depending on the enemy and ally lineup.
Cookie-Cutter
Anti-Mage/Counter-Escape
Hard-Carry
Let's take it from the top.
Cookie-Cutter
This is the average Bounty Hunter build. You will most likely go for this if the enemy team doesn't possess anything too tricky, or too annoying.
1. Start of with 2
 Slippers of Agility
, 2
 Iron Branch
es and some combination of
 Tango
Tangos and
 Healing Salve
s. This will give you decent early game stats to last hit more easily.
2. Build the Slippers of Agility into a
 Poor Man's Shield
. As a melee hero you get the full effect of this, which is a 100% block of 20 damage. As most heros will have between 50-70 damage early on, you're reducing incoming damage by a hefty amount. Coupled with your Healing Salves and Tangos, you'll be able to stay in lane for quite some time without needing to back. I love
Poor Man's Shield early on for Bounty Hunter, because if you're harassing the enemy heros, you're going to take almost as much damage from creeps as you dealt. This solves that problem.
3.
 Ring of Basilius
 is up next. The early armor will reduce incoming damage even more and the mana regen will make it so that you will always have mana for Shadow Walk.
4.
 Boots of Speed
 are your next priority. You're going to need this to really secure your kills, and it will help you roam much faster, instead of wasting time plodding through the river at the speed of a snail.
5.
SituationalYou can spare the 200 gold for
 Sentry Ward
s. If the enemy team is getting these and your support hasnt already picked them up, you need them. Otherwise, you're pretty much kicked out of the lane. A ward war may be slightly expensive but its worth staying in your lane and getting levels and creep farm to compensate.
6.
 Power Treads
 are next. The strength gain is really what you're looking for here. You don't need the extra movement speed of other boots, because of your Track. You need to be able to tank more hits while you're charging after some poor lone Leshrac.
7.
 Vladmir's Offering
 is a personal favorite. I love this item because it lets you go in for a gank, come out with half to very little health, and be able to get up to full health in the jungle or in a lane and jump back into the action. You will have gold to spend because of your
Track but you don't want to be spending it on countless teleport scrolls or healing salves.
8.
 Bottle
 really should be a situational item. This is very dependent on how aggressive your team is with warding. If you will almost always know where the rune is, get
Bottle. It will keep you in action longer than any other item early game. However, if you don't always get the rune, or worse, rarely get it, you're just wasting 600 gold that could go to Vlad's which will really give the same effect, albeit over time.
9. At this stage, you have plenty of options to choose from. As I said before, you are a skill based hero, so the items should fit whether you use those skills aggressively or defensively.
[*]
 Desolator
 This item gives solid damage and works well with your track. Plus, it allows you to reduce armor on those people who you haven't tracked yet, and works well at towers and in jungle.
[*]
 Monkey King Bar
 The damage from this is the 2nd most in the game, and the mini-stun component will be hell for any channelers/tpers in conjunction with your Shuriken Toss. Also, it will help you assassinate carries who have picked up Butterfly.
[*]
 Butterfly
 The ultimate carry item. Everything you want, it has. However, it won't give you any real health, so you can still be nuked down. Basically, you'll want this whenever they have lots of sustained physical dps.
[*]
 Vanguard
 Really not a luxury, more of a situational item. It's not part of core because I rarely get it or need it, but if they have too much physical dps early on, this will help greatly. Also, it can replace Vlad's for sustaining hp between fights, if you so desire.
[*]
 Assault Cuirass
 Again, counter's the dps and synergizes with the armor reduction from Track.
Note: Honestly, you don't need any of the items past the core to do well as Bounty Hunter. I've had games where I ran around with 5~6k gold and only treads and Vlad's. The items will beef you up, or give you some more damage, but really none of it matters if you don't play the hero well.
Anti-Mage/Counter-Escape
This build is specialized towards dealing with teams that seem otherwise ungankable/unchaseable (i.e. the enemy comprises of Anti-Mage, Windrunner, Queen of Pain, etc. etc.) Following this build will make ganking much easier and much more effective. Also, this is the build I recommend when facing teams that have tons of stuns and burst damage.
1. The set-up is the same.
2. However, you will build those slippers up to
 Wraith Band
s. These will help you to absorb more of the nuke damage that will be directed your way, and also compensates to some degree for your decidedly low mana pool.
3. A
 Magic Stick
 is not essential but will really help you keep up both your mana and health, especially against heros who have low cooldown spells.
4. Next up, a
 Medallion of Courage
. This is a solid item for most gankers, and complements your
Track. Also, the armor and mana regen both help you stay in the field longer. -6 armor debuf from
Medallion of Courage is equivalent to the debuff from
Desolator at less than 1/4 the cost. This is key, as it will help you take down those pesky heros who can jump or blink away very quickly in fewer hits.
5.
 Phase Boots
 You won't have the health from Power Treads, but that is almost entirely compensated by your Wraith Bands. Phase Boots will function rather as a means of keeping up with those escape-heros. Also, the +24 damage will help secure the kill in fewer hits. (Note: I don't really like Phase Boots in any other scenario, simply because most of your time should be spent invisible so as to keep your whereabouts a mystery. Phasing all over the map will really decrease your global presence. Which is bad.)
6.
 Orchid Malevolence
 is the true "core" item of this build. The mana regen and pool that this gives you will make you a pain in the butt for enemies, even when they know you are there. Also, you will not have to worry about running out of mana for Shadow Walk in the middle of a fight. So long as you can keep your hp up, Orchid will take care of the rest, and keep you really independent from the fountain. More important than the stats though, is the active.
Orchid Malevolence's active silences an enemy for 5 seconds. Especially at lower levels, 5 seconds is more than enough to kill a hero, ESPECIALLY since they can't jump away to safety. This item really defines the anti-escape build and makes heros like Weaver, who have multiple escape mechanisms, that much more gankable. Even if they do get away, there is an additional 25% damage dealt at the end of the duration, so enemies who barely escape will still die. Because of its 18 second cooldown and 900 cast range, this item will remain effective long into the endgame.
7.
 Diffusal Blade
 I find this item to be incredibly helpful when facing an escape team. After silencing the enemy, you have 5 seconds to whack away at them. You want to get the most hits in as possible, and Diffusal Blade helps you do just that. Together with your
Jinada it will almost guarantee the kill. It has various other ganking uses as well. Dark Seer
 Surge
Surge'ing away? Diffusal will slow him down. Sven's
 God's Strength
 too powerful to handle? Diffusal takes care of that. Also, it has retreat potential also. Want to save an ally being chased but you're at low health? Diffusal gives you a ranged slow that will ensure that both you and your ally get to safety.
8. At this point, you have solid damage and chasing potential. Now you need to make sure that you can chase as long as possible, and survive as long as possible, especially against a team of bursting heros, particularly those who can fight back while they run such as
 Leshrac
. You have three prime options:
[*]
 Black King Bar
 All-around the best defensive item in the game. Gives you health and more importantly, Avatar. The active makes you immune to all crowd-control effects except from ultimates, and even then, damage does not apply. This means you can jump into a teamfight and not be worried about getting focused down before any of your teammates can help you. A definite must against a burst team.
[*]
 Linken's Sphere
 Not something to get at the beginning or middle of the game. It is too expensive to justify unless the enemy has some seriously powerful single-target spells like
 Doom
Doom or
 Fiend's Grip
. If they do have these spells though, the health, mana, armor (from agility), regen and spell negation will go a long way in keeping you running even if you get caught with your pants down.
[*]
 Heart of Tarrasque
 Really an amazing item on Bounty Hunter. The huge hp boost lets you absorb tons of damage for your team, and in combination with Linken's Sphere or BKB will pretty much make you a juggernaut. Also, you never have to go back to base after getting this. Even if the enemy is nearby, spending 5-10 seconds in
Shadow Walk will have you back and ready for action.
Note: These are all expensive items, and in the course of most games, you won't get even two of them. Determine the strengths of the enemy team and decide for yourself which of the 3 would be a better fit for your situation.
Hard-Carry
Tsk, tsk... what is your team thinking? Leaving you to carry all by yourself. Ah well, when life gives you lemons...make a Battle Fury. This build requires an explanation of how and when to use it. Every so often, when playing Bounty Hunter, you believe your team will pick wisely and instead jump for 4 support heros. Where does this leave you? It leaves you with the task of carrying your team. This is not good, for several reasons. You have no range, so you have to be upclose and personal. You have no stun or hard crowd control with which to 1-on-1 an enemy carry. You don't have built-in sustain such as lifesteal to keep you in a fight for very long. Nonetheless you are going to go valiantly where many idiots have gone before.
1. Start off with a number of
Iron Branches, its really up to you, but you most definitely want 6-9 tangos. Maybe even a salve. The point is, you DO NOT want to get harassed out of your lane before you can farm up 875 gold for a Ring of Health.
2. Get the Ring of Health
3. Ignore your stupid teammates and jack every single last hit that you can reach. Build up your perseverance ASAP. Ganking will only pertain to your lane. You will rely on teammates to gank for you, instead of the other way around.
4. Boots are optional, simply because you won't be ganking, BUT it may help you survive a potential counter-gank.
5.
 Battle Fury
 time. Yes. You now have ample health and mana regen that are really unnecessary because you're not ganking. Instead you are in the enemy/ally jungle, stripping Kobolds of their dignity.
6. Repeat step 3, except now rush your Power Treads and
 Helm of the Dominator
. Why you ask? Because it makes you jungle faster and with more sustain.
7. Get a
 Yasha
Yasha because you can get to creep camps faster and escape counter-gankers.
8. Farm just a litttttle bit more and get your
 Manta Style
. It's not "the best" item per se, but it gives you decent pushing power, and adds to your total damage output and survivability during a teamfight. Because you are the hard-carry, the health from Manta Style is much needed.
9. At this point, if your team hasn't rage-quitted yet, you can engage in ganks and teamfights. Depending on how fast you farmed these items up, the enemy team may or may not be able to cope. You really just have to cross your fingers and hope that your team didn't feed too hard up to this point.
10. Next build a
Butterfly. The evasion will make you and your clones a huge threat in teamfights, and also will make it more difficult for teams to identify which of the images is the real deal. Also, the damage, attack speed, and armor (from agility) will help you stand your ground in any 1-on-1 situation.
11. Finish your Helm into a
 Satanic
. The health boost, plus evasion, plus lifesteal will pretty much make your clones invincible. They can probably bd turrets by themselves. If the enemy does manage to kill your clones and target you, the Satanic active will keep you at full health for a long time.
12. Finally, build a
 Maelstrom
 and cap it off into a
 Mjollnir
. The
Unique Attack Modifier from this will allow Satanic to still work. You just will not lifesteal on the hits that Chain Lightning procs. It's worth it. You and your clones wreak havoc in any fight, and the Chain Lightning combined with Battle Fury means you can push down creep waves, towers and barracks solo, and with ridiculous speed.
Note: This last build is really a last resort build. If you are ever put in this situation, you just have to hope that the enemy team sucks, or that your team manages to hold out for 25~30 minutes. Chances are, you won't even get past step 10 most of the time; the game will have already been decided in most cases. Nonetheless, if you MUST play the hard-carry for your team, this build should hopefully grant you success in playing that role.
Buddies, B*tches and Bouncers
Buddies
These heros synergize well with the Bounty Hunter for 1 of 2 reasons:
1. Gondar's abilities improve the partner
2. The partner's abilities improve Gondar


These heros all have long-ranged skills that require considerable precision and timing. Gondar's
Track reveals the target's location and makes an ally's skill that much easier to land.

These heros have slows which, coupled with
Jinada, make for a powerful laning combo, even before getting
Track.


These heros are immensely powerful early game, but need to keep up with the enemy to do anything. A properly placed
Jinada can easily gnab first blood for your ally.

Dark seer synergizes magically with Gondar, because of his Area-of-Effect skill,
 Ion Shell
. Invisibly following enemies while Ion Shell'd will damage them continuously. While more experienced players will know what is happening, n00bs will be confounded endlessly and very often die without being any the wiser.

Omniknight's
 Repel
Repel is invaluable when playing with more experienced players.
Sentry Ward and Gem of Truesight can stagnate a Gondar into nothingness.
Repel allows you to initiate on a target or assassinate a squishy in a teamfight without being bursted/nuked to smithereens, even if they can see you.


Weaver, Shadow Fiend and Dazzle are grouped because they each reduce enemy armor significantly with their skills. Coupled with
Track, the debuff causes Jinada's critical proc to skyrocket, giving him that much more burst damage and assassination ability. Oh, and the debuffs work on multiple heros simultaneously =D
I admit this is not an exhaustive list by any means. Here I have only presented some of the heros who work well with the Bounty Hunter. Keep an open mind when watching your ally's picks because Gondar can create devastating combos with any number of heros. You just need a little imagination
B*tches
These heros tremble in their boots, and jump at their own shadows when they know that Gondar is lurking nearby.


This is a special group of heros that rely to some degree on invisibility as part of their gameplay strategy. Bounty Hunter's
Track renders their innate escape mechanisms all but meaningless, whereas yours remains effective. This means that Bounty Hunter will have a more dominant global presence than other invisible heros in the same game.

Bounty Hunter does not directly counter these heros or their abilities, but they are known to frequent
 Shadow Blade
 so Bounty Hunter can counter one of their prospective escape items, if they are foolish enough to get it still.


What sets these 3 apart is not the Intelligence primary stat, but the fact that each has a powerful ultimate that
channels. If left untended, these ultimates can demolish teams/individuals in short order. Bounty Hunter's
Shuriken Toss cancels these ultimates, and can turn the tide very quickly on a team that has come in overconfident, and unprepared.
Note: You have a distinct advantage over the aforementioned heros, but more often than not, they will take measures to counter you. Overconfidence will be your downfall against these heros.
Bouncers

Where to begin... Perhaps at level 6. At level 6, both of you get moves that give vision of the target. Because of your invisibility component, this is much more detrimental to your playstyle than to his. Even so, you're way out of reach when he's
Tracked right? WRONG. His Sprint is to your measly movespeed bonus, as Usain Bolt is to a sloth. A ******ed sloth. Alright, fine, he can catch you, I'll duke it out. Tut, tut.. wrong again. He plows through your already scarce armor, whereas you have only just dented his fishy shield. On top of that, he has incredible early damage and attack speed, so he will stomp you. And just as you're getting the idea that he might be "just a little" stronger than you, he drives it home with his Bash as you try to escape his moist clutches. He will terminate you with prejudice all game long. When he gets a BKB, life only gets better. Don't do it. If you pick Bounty Hunter while Slardar is on the map, I will find you and cut you down myself you little sh*t.
Doom Bringer
This buttcrack of a hero deserves a place in every guide. His ultimate,
Doom, is by far the most powerful 1-on-1 skill to date. As I said before, Bounty Hunter is severely reliant on his skills and without them, he will be crushed without remorse. Of course, Doom can be reserved for other members of your team, but you are a very valid candidate. The silence means no
Track, no slow from
Jinada and no tp/skill cancelling from
Shuriken Toss which will make it much easier for the enemy team to mop up your allies. You may be thinking "Look dis noob, he doesn't no what is Linkens!" If you save up the 5200 gold required to buy Linken's, you've already greatly detoured from other more important items, and will be that much more behind.

Tiny possesses a sheer burst damage output that will make kids cry at the 45-minute-mark. Your 325 damage
Shuriken Toss will look like a toy when you are tossed and subsequently crushed under a mountain of rocks. On top of that, a well-played Tiny commands infinitely more global presence than you. But sure, if you want to, go for it. Don't come crying to me when you can't poop because there's still a huge rock up your butt from 2 months ago.


These two are special cases. Huskar is part of it simply because he commonly will grab a lifesteal item. 1-on-1 assassination will reverse on you in a matter of seconds, as you find your whiskers on fire or your guts spilling out of your stomach while some weird doglike monster drinks the blood that coats your now detached organs. Lifestealer has the additional benefit of being able to shrug off your slow, your Track and your Toss at the touch of a button. Yes, they can be ganked as a team, but likely they will have teammates nearby as well, and your contributions to the fight will be negligent at best.
Note: In my opinion, these heros really decimate the benefits that Bounty Hunter can bring to any lineup. This isn't to say that he can't still kill noobs all over the place. However, if you're playing in a competitive environment (i.e. tournament, etc) you will find yourself meeting with alot of frustration as your kills and assists stagnate the further the game progresses.
Gameplay
This section is going to be short as the discussion is going to be abstract. Because of Bounty Hunter's versatility, I feel it would be wrong to dictate one certain playstyle over another. I personally do not consistently stick to a particular style, so I can't define the "correct" style. Adaptation is really the key.
Levels 1-5: Lane and farm up cautiously, assuring your safety over all else. Dying early will greatly stunt your level growth and put you at a huge disadvantage in your lane. Harassing is encouraged, and by level 3 you can attempt to get kills, but always try to have your invisibility off cooldown when initiating.
Levels 6-10: Level up Track and roam. If opportunities don't present themselves, get back to a lane and farm. Keep a teleport scroll on you at all times, and try to keep at least 200 mana, so that you can gank or counter-gank without being visible the whole time.
Leave the main carries to farm up, and pull one or two heros with you to gank. Be especially aggressive here, as this is when farming items (i.e. Hand of Midas/Battle Fury)will be bought, and the goal is to keep enemy levels and farm down at all costs.
Levels 11-15: Start building up luxury items, and use Shadow Walk to facilitate teamfights that you will win, or escape from fights you will not win. Keep a steady eye on Roshan at all times.
Levels 16+: Depends on the relative position of your team compared to theirs. If winning, push with the team, and try to get into the enemy base. If losing, make sure the map is well warded and see if you can get some kills solo on enemy carries/supports. Otherwise, stick with the team.
Tactics, Tips and Tricks
These are some of the things I try to remember to do when playing Bounty Hunter:
1. Always have mana for Shadow Walk. If you're planning on ganking someone and you think it could backfire, make sure that after all your spells have been used, you still have 50 mana to burn.
2. Track all the time. It has a really low mana cost, meaninglessly low when your mana pool increases, and your teammates are more confident about ganking when an enemy is marked.
3. Save Shuriken Toss for the end of a fight/gank. Initiating with Shuriken may seem like a good idea, but it means breaking your invisibility to do it, which costs you the 120 backstab damage already. You'll want it up if the enemy is planning on tp'ing out. The Toss itself has a very large casting range so you will be able to snag enemies running away at very low health.
4. Scout out. If you're not farming, you're planning ganks. The best way to do that is to scout the surrounding area with your invisibility. You will have a much higher success rate if you know where the enemy heros are prior to initiating. This will help prevent ridiculous 5-man counterganks from the enemy team.
5. Use Track as a defensive measure. The thing I see most often, which really depresses me, is when Bounty Hunter's sit there and take it when they are found. Your Track will give you a huge speed bonus that the enemy won't have and it drastically increases your chance of survival, especially if you are not stunned or disabled. This leads into my next point..
6. Don't abandon your teammates. Even if you are at low health, there are a number of things you can do that will help your allies get to safety and still keep you alive in the process. Track an aggressive Ursa chasing your teammate. Go behind him and use your Jinada on him and then Shadow Walk back into safety. Drop a Diffusal Blade Purge on him if you have it. The point is, there are a lot of ways Bounty Hunter can serve his teammates in a defensive manner as well. It's just common sense to want to reduce collateral damage from ganks.
7. Understand the enemy team. If you don't know heros, look them up. This includes keeping track of cooldown timers and the like. You also want to monitor their mana pool, health pool and possession of wards/dust before jumping into the fray. Quick calculations are really important not only for Bounty Hunter, but for becoming a better DOTA 2 player overall.
8. Along with that, position yourself accordingly. If you need to be the initiator, initiate. If the enemy will crush you, have someone else do it. For example, if the enemy has a Sand King, you want to be out of the range of his stun so you can cancel his  Epicenter before it fully channels.
9. Know when you are useful and when you are not. If the enemy team is hugging their tower and you know there's nothing you or your team can do, leave it be. Don't stand around for 4-5 minutes at a time waiting them out. Go farm somewhere. Likewise...
10. If you are doing well, keep your momentum rolling. Semi-carries have an effect called snowballing. This means, if they do well early on, they can snowball into a huge threat very quickly. If you get some early kills don't wait around for more opportunities to serve themselves on a silver platter. Go searching for opportunity. Most of the time you'll find it.
11. Be a leader. Bounty Hunter is a mad ganker but this means nothing if your team doesn't know what you want. Standing around in a lane might just mean you're leeching exp or sitting by Roshan might mean you're trolling. Lead without dictating and your team is more apt to follow you. Making sure that you and your mates are on the same page will determine whether or not they are ready to tango when you initiate.
12. Enjoy yourself. I honestly find Bounty Hunter to be one of the most fun heros in the game to date, and playing him multiple times doesn't have to feel repetitive. If you let yourself get too engrossed in the finer details, you're likely to miss the big picture, and that's when you'll make mistakes. Don't ruin your own experience with this cuddly cat because you want to win too badly.
In Conclusion...
Well, that was it. My first attempt at a guide. Dear god, it took so damn long... I feel like I just finished an English term paper. Still I'm glad that I did it.
I consistently see people who don't know how to play Bounty Hunter fail miserably and then drop the hero forever. I suppose a huge part of the DOTA 2 experience is improving the community and this is my little hand in that. Hopefully, after reading this guide, at least one person will pick up this lethal cougar and proceed to rip someone's butt open.
It's not as flashy as some other guides, that's for sure, but I believe wholeheartedly that it is a full guide. To the reader, I say if you liked it or gained anything from it, upvote. The more upvotes, the more readers, and the more critique I will get to improve on my guidemaking and on my Bounty Hunter skills as well. If you didn't like it, or disagreed with certain points, post a comment and explain your PoV (point-of-view) to me before you downvote. If you can sway me, I'll edit it accordingly.
Thanks for reading, more coming soon I hope! (update)
~MadMoose


Quick Comment (77) View Comments
You need to log in before commenting.