Please verify that you are not a bot to cast your vote.
Help SupportOur Growing Community
DOTAFire is a community that lives to help every Dota 2 player take their game to the next level by having open access to all our tools and resources. Please consider supporting us by whitelisting us in your ad blocker!
Want to support DOTAFire with an ad-free experience? You can support us ad-free for less than $1 a month!
I'm Peppo_o'Paccio, I made this guide because I like Beastmaster very much: after playing a few matches with a build found on this website I started to watch competitive Beastmaster players, from which I learned a lot of things.
Talking about the support builds it isn't just my way of playing Beastmaster, it's the competitive way to play him: obviously there isn't the "best" build but these ones I made are based on the builds of my favourite competitive Beastmaster players.
I'm going to add even a semy-carryish build I made watching some pub players (like Purge) and other builds found on the Internet.
to attack a neutral creep camp at the right time (about X:52) and let them follow you so that a new group of creeps will spawn besides the one that were following you.
Note: Beastmaster can stack two creep camps at once thanks to his Wild Axes.
to place Observer Wards for various reasons, such as rune controlling, enemy spotting and defending.
Counter warding:
the act of placing Sentry Wards in order to spot and destroy the enemy Observer Wards. Usually this is not done in public games, since almost no-one places wards.
This is Beastmaster's main skill and is always levelled at level 1: remember that it deals composite damage, thus you can use it on magic-immune targets (someone who is under the influence of Black King Bar or Rage, for example). It's pretty mana expensive but it has many uses:
Clear Trees: If you expect to be ganked or if you are chasing a juking enemy, you can use your Wild Axes to remove the trees in your path. Be wary: if you use it you won't move for a small amount of time, thus you may end losing the enemy you were chasing.
Harass/last hit: if you use this skill well, you can hit an enemy twice. Mind that it has very long range: throw your axes as far as you can, you'll get the hang after a few tries; also, you can easily last hit fleeing heroes that your teammates can't reach. If you use it to harass, remember that in the early stages of the game it could be very mana expensive.
Push: if you hit the enemy creeps with your axes, you can almost clear an entire wave. Use it wisely though, because you can end up being ganked if you push at the wrong time.
Creep stack/pull: an interesting aspect of the axes is that you can use them to stack two camps at once; you can even use them to deny an entire creep wave without double stacking a camp. An example is shown in the video above.
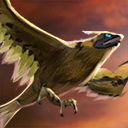
Call of the Wild
This skill pairs well with Beastmaster's lack of mobility in the early stages of the game: if you have already played other heroes that require micromanagement you could find it easier to use the two animals.
At the first level it just creates the Hawk, while from the second level you can control both the Hawk and the Boar. The other two levels strengthen the creatures, giving interesting upgrades.
The Hawk can be used to scout the map, thus giving a sort of global presence to the Hero and a "mobile ward", as said before. Plus if this ability is maxed out, your enemies will need to counterward in order to find your hawk, which becomes invisible.
Always use the hawk to spot the runes if there are no friendly wards nearby, especially if you're carrying a bottle.
The Boar complements Beastmaster's melee disadvantage, you can use it both as an offense or defense: a slowed enemy can be reached before and can be easier to flee from.
If you have basic micromanagement skills you won't find difficult to direct your Boar to the enemy while you are escaping, but mind that it gives a small amount of gold when dying.
Inner Beast is Beastmaster's passive skill: it should only be levelled after the other two, as the attack speed increase is useful in teamfights (which usually don't happen in early-mid game). At level 4 it gives you 40 more attack speed: in fact this is a percentage, which modifies the speed following the formula Attacks per Second = (1 + IAS) / 1.7, where 1.7 is the base attack time of Beastmaster and IAS is the increase of the attack speed (which should be divided by 100%, as it is a percentage).
So, at level 4 your attack time becomes roughly 0.82, which means about 0.97 attacks per second: starting from the 0.69 attacks per second at level 1 this is a nice bonus, though you won't even notice it.
Also remember that even your allies will benefit from the bonus, so Beastmaster's usefulness in teamfight increases exponentially as the ability gains levels.
This ultimate is helpful in any situations: its main use is to guarantee Beastmaster's presence in teamfights as the stun can last up to 4 seconds, which is a great advantage.
This skill can be used to succesfully initiate a teamfight: it's a single target skill, but besides stunning the target enemy it slows the other enemy Heroes for the same amount of time (4 seconds if maxed out).
You can even use it to chase a fleeing enemy, because its stun can help you and your teammates to kill them: this, coupled with the ability of the Wild Axes to clear the path from the trees, will make you a feared ganker or counter-ganker.
If you are wondering, yes: it's upgradable with Aghanim's Scepter, which reduces the cooldown for a good amount of time and makes the damage more than 50% more powerful.
Stats
Usually stats are never taken on Beastmaster before level 15: if you think your mana isn't enough you can buy an early Clarity, but you must have bought a Bottle or a Soul Ring in the early game to obviate the question. Also, this Hero doesn't need armor or HP increase nor damage increase.
This item build is based on coL.HANNAH_MONTANA's playing style, from compLexity Gaming: it's focused on getting a Pipe of Insight as fast as possible, after getting some common items such as Boots of Speed. Then you can partecipate in teamfights with your maxed-out Primal Roar and a Blink Dagger, which can be useful to escape, too.
Starting items
First, remember that you can take either the Animal Courier or the Observer Wards.
The total cost of these items is 543 gold: if you are wondering why you shouldn't take another Iron Branch, it's because a second Branch is redundant: you need one to craft a Headdress in order to make the Pipe, and also it's the most common starting item.
The Stout Shield is here to ensure you won't get damaged too much from the enemy creeps and harassers, though you don't need to upgrade it into a Vanguard or a Poor Man's Shield.
Beastmaster, as almost all the other Heroes, needs a health regeneration item: you can choose between Tangos or Healing Salves, but remember that the Shield and his decent HP pool make him a difficult enemy to damage so much. Professional players rarely take a Salve, but it would be wise to take the one that adapts more to your situation.
At last, if you want, you can buy an early Clarity if you are going to spam your Wild Axes or cut down trees: mind anyway that the Soul Ring costs 800 gold and the Bottle 600, which are big prices for an early game item. Even saving 50 gold can help you get them faster.
Early game items
I'll say this again, take either the Soul Ringor the Bottle: taking both implies a huge expenditure of gold, which slows your core items by quite a bit.
When to take a Soul Ring? When your mid laner is buying a Bottle and when you are going to use your Wild Axes a lot. Also, if you take the Soul Ring you are going to stay in the safe lane babysitting the hard carry, while cutting down trees and harassing the enemies.
If you took a Bottle it means that your mid laner can't afford it and/or doesn't need it: the health and mana regeneration can be compared to the benefits from the Soul Ring, but aside from that you can even take runes, which completely change your playing style. With a Bottle you can roam a bit, killing the enemy Heroes if you have a good rune.
Also, remember that wether or not you have a Bottle, you should always spot the runes with the Hawk.
The Ring of Health is nothing more than a component of the Pipe of Insight that can be bought at the side lane shop and grants a nice benefit.
The Flying Courier is optional: if no one has already bought it, take it. Remember that you can buy it from everywhere, even if you aren't near a shop.
Mid game items
After getting the early game items, you are going to build a Pipe of Insight as fast as you can: start from the Hood of Defiance and then craft the Headdress using the Branch you took at the beginning.
Now you should ask yourself which boots you have to buy: if no one else has them yet buy a pair of Arcane Boots, which can be used as a substitute of the Soul Ring if you need to sell it for money.
If someone else has the Arcane Boots you can choose: if you think you need to deal more damage and need a support in chasing, then the Phase Boots are a nice choice. Plus they prevent your Boar from blocking you while moving, though you could end up leaving it behind. I prefer the Phase Boots, but most of the time I have to buy the Arcane Boots because they synergize well with Beastmaster.
The Blink Dagger is a pillar of this build: it grants you a semi-carryish playing style after you have done babysitting the carry, so that you can keep your presence in teamfights: also, you can use it to chase the enemies or to escape before they attack you.
I also thought about substituting it with a Force Staff: if you have bought a Bottle in the early game and you've already sold it it can be a perfect item, especially if you have chosen Phase Boots: it gives you more roaming capabilities and a reliable escape even if you are being attacked. Overall it's a worse choice: even if I love it you can't choose the exact point to teleport to, and this makes the Force Staff a not-so-good item.
Late game items
This is by far one of the best items for Beastmaster: besides giving you a larger mana pool (which shouldn't be a real problem anyway) it gives more strength (so, both more HP and damage) and a pair of nice beings which combo well with the slow from the Boar. If you buy its recipe three times you can succesfully tank a tower with them and deal a decent amount of damage even when the game progresses.
This is the other common choice for the first late game item: though it pairs well with a Mekansm as it adds more survivability, when you have a +11 increase of your HP gained per second it's less useful. But don't forget the best part, the upgrade of your ultimate: if you are winning and the enemies are turtling in their base it would be better to take a Necronomicon instead, but if teamfights are still going on you should buy it with no doubt.
Other common choices after the first late game item:
In these situations, this is the best item Beastmaster can buy: as he is (with this build) half-support half-initiator it can save your life many times, mostly because the initiators are targeted by stuns and slows. Also, it gives you more damage and strength.
If you manage to roam after getting your late game item, this is a good choice: you can take it if you die a lot, so that you can return into the fray in a bunch of seconds. If you have Arcane Boots you can even break them up so that you can keep your Boots of Speed!
I don't recommend it, but if you have money to spend you can take some armor: the Blade Mail gives good upgrades and an active which pairs well with Beastmaster's large HP pool. It doesn't cost much and gives good benefits compared to the price.
Well, Beastmaster is a melee Hero and Vladimir's Offering is... For melee Heroes. If you think your team needs it, you can buy this when late game arrives: the more Heroes in your team are melee, the better.
Don't forget that Vlad's gives +2 HP regeneration to you but gives more damage, armor and mana regeneration to everyone that is at least 900 units near you, not only melee Heroes. The lifesteal applies to all the melee Heroes of your team within its radius.
This is the ultimate item for Beastmaster: it makes you a feared ganker and pairs well with your passive ability, Inner Beast. The armor makes you even more tanky while dealing good damage thanks to the attach speed increase; remember, anyway, that it doesn't stack with Vladmir's aura, so don't take both in the same game.
Usually the Drum of Endurance is taken by other Heroes, but if you reached late game and nobody has bought it why shouldn't you take it? It gives a lot of stats and an aura that icreases move speed and attack speed. Plus, in combination with an Assault Cuirass, you'll become a sort of moving Hyperstone for your entire team.
Heaven's Halberd is one of the best items for any strength Hero: it gives more strength and damage, aside from the evasion. If you focus on ganking because there is already an initiator in your team you can take it, but you could use other items that help your team or your stats more. Remember that you are a support, so don't focus on getting damage increasing items, though this can be useful in certain situations.
Common items that you should avoid in competitive matches:
The Monkey King Bar is made for carries: it doesn't affect your stats, only your damage, increasing it by 88 while giving mini-bashes and a little more attack speed. Normally you shouldn't take it, but it can be good for pub stomping.
Well, Heart of Tarrasque is a perfect item for any strength Hero, right? Wrong. With this build you don't need more HP regeneration, you already have a Pipe of Insight. Also, you can have bonus health even with a Heaven's Halberd or a Drum of Endurance: if you are farming reeeeally well you can take it, but in competitive plays it's rarely used.
This could seem a nice alternative to the Assault Cuirass, but it's worse for you: the Cuirass has an aura which stacks and synergizes well with your passive ability, and you don't need more intelligence at all. Probably if you are thinking about buying a Shiva's Guard your team's intelligence Heroes have already bought it, so it's a waste.
This item build is inspired by the playing style of LGD.Taobao.xiao8 from LGD-Gaming: when there are no support Heroes that can buy a Mekansm, it should be your first priority. These core items are a lot less expensive, but they are still indispensable for a team.
Starting items
As always, take either the Animal Courier or the Observer Wards: you are a support and those ones are the main items they have to buy.
With the Stout Shield you won't get damaged too much while you try to defend your carry, but remember that it doesn't block all damage, so stay aware.
These are the same starting items of the "support with Pipe of Insight" build, with one exception: there are two Iron Branches: this is because you need two of them in order to build a Mekansm, one for the Headdress and one for the Buckler.
One of the first items should be a Tango, it can save your life many times: if you don't need it, give them to your friend in the same lane or sell it.
Early game items
These are the same items of the other build, but you have to take a Headdress instead of the Ring of Health: you'll craft it later into a Mekansm, and remember that it gives a useful aura.
As always, take either the Soul Ring or the Bottle and take the Flying Courier if no one else buys it.
Take the Boots of Speed right after one of them to increase your already good speed.
Mid game items
Take the Mekansm right after the Flying Courier: in teamfights you're going to need the healing and armor increase that it gives with the active; it gives a +4 HP regeneration to all of the allied Heroes near you, too.
For the boots, take the Arcane Boots if you need more mana and you are still going to support your carry; take the Phase Boots if you are ganking well or simply if you need that speed boost and the damage increase. You can find further explanation in the "support with Pipe of Insight" build.
An early Cloak is to ensure that your lack of more HP regeneration (as the Pipe of Insight gives +11 HP regeneration) won't be lethal in teamfights, and can be later built into a Hood of Defiance if you need it.
Late game items
With this build professional players prefer to build Aghanim's Scepter first, because the lack of more mid game items makes it a good choice as the teamfights should be going on. If your team is already winning and is pushing the last two towers, you could think about buying a Necronomicon. Still, Agh's is always useful in any situations.
There aren't many situations in which the Necronomicon is preferable to the Scepter, but it's still a good choice: you can buy it right after Agh's, if you can afford it.
Other common choices after the first late game item:
Well, Black King Bar could be more useful if playing as an initiator, but even without a Blink Dagger you might get targeted by the enemy: aside from the active, the strength increase can save your life, too.
As said before, the Boots of Tavel can be used by Beastmaster to grant more base speed and an effect similar to the one of the Town Portal Scroll, but that can teleport yourself to your allied creeps, too.
The Blade Mail costs 2200 gold and can be reliable while tanking the hits or chasing an autoattacker, such as Anti-Mage.
I don't like to repeat myself, but remember to take it if your team has many melee Heroes that hvaen't bought it.
This can be listed as a late game item: if no one initiates succesfully you can try to do so, because with your Aghanim's Scepter you can even use Primal Roar more than once in a fight. It deals 950 damage, and if you manage to surprise the enemies your team can easily finish them off.
What about the Cuirass? As explained in the previous chapter, it's perfect as a late game item.
Almost every team needs a Drum of Endurance, if your team doesn't have it just go ahead and buy it.
Heaven's Halberd is a nice item for any strength Heroes, as said before, but it doesn't fit very well wit Beastmaster's playing style. Buy it if you're sure you'll need it, else take an item between aforementioned ones.
Common items that you should avoid in competitive matches, description copied from the previous chapter:
The Monkey King Bar is made for carries: it doesn't affect your stats, only your damage, increasing it by 88 while giving mini-bashes and a little more attack speed. Normally you shouldn't take it, but it can be good for pub stomping.
Well, Heart of Tarrasque is a perfect item for any strength Hero, right? Wrong. With this build you don't need more HP regeneration, you already have a Pipe of Insight. Also, you can have bonus health even with a Heaven's Halberd or a Drum of Endurance: if you are farming reeeeally well you can take it, but in competitive plays it's rarely used.
This could seem a nice alternative to the Assault Cuirass, but it's worse for you: the Cuirass has an aura which stacks and synergizes well with your passive ability, and you don't need more intelligence at all. Probably if you are thinking about buying a Shiva's Guard your team's intelligence Heroes have already bought it, so it's a waste.
In public games Beastmaster could be picked as a carry or such: if you kill a lot of people while ganking or are obliged to farm, you could think about buying tanky items and strength-increasing weapons. Personally I don't recommend this build, but it's still very effective in pubs.
Starting Items
An important item to get while starting a match is the Stout Shield: not only it gives you a nice defense, but can even be crafted into a Vanguard later. This is one of the most common items taken by a lot of other melee Heroes, too.
After getting a Tango or Healing Salve, make sure you buy three Iron Branches: they will give nice early stats and will be crafted later into a Magic Wand.
If you can't last hit properly, you could think about buying a Quelling Blade instead of the Shield: it slows your core items by a bit, but if you really need it you'll gain more gold after a few last hits that you would have missed without it.
Also, you can use it to cut down the lane trees if you have missed some of them with your Wild Axes.
Early game items
Again, take either the Soul Ringor the Bottle: if you use this build you'll probably opt for the Bottle, but if the mid laner has already taken it buy the Ring instead.
The Boots of Speed are here to ensure that you can chase your enemies while ganking or to escape while farming. Plus, the Magic Wand can save your life if you get caught.
Mid game items
Here you should take a pair of boots based on you preference and the situation: I usually go for the Phase Boots, because they make much easier to chase an enemy and the damage increase is convenient. If you don't like them, remember that the Power Treads are very common with the Bottle: if you can tread switch properly you can gain more health and mana than without them. Take the Treads if you want to keep your Bottle even in mid-late game.
The Vanguard is the most common tanky item for semi-carries: it gives you decent HP regen, a bigger HP pool and the ability to block some damage (more than with just the Stout Shield). It doesn't cost very much and makes your mid game items very cheap.
Late Game Items
This item works well with any Beastmaster build, even the semi-carryish one: maybe you could find it difficult to initiate, but the huge damage of your ultimate can be used even for chasing purposes. Remember that it reduces the cooldown, too.
You could think about buying this insted of the Scepter if your team needs a good initiator: also, you can take this right after Agh's to ensure your initiation will be succesful.
This is just a substitute for the Blink Dagger: take this if you need to initiate and you are dying many times (it can be used to escape from ganks, too!), mostly if your enemies have powerful slows.
Other common choices after the first late game item:
While using this build you can (and will, if you have gold to spend) take a Heart of Tarrasque: the HP regen coupled with the strength and HP increase will make you a feared enemy that deals a nice amount of damage, too. While building it make sure you get the Reaver first, as it gives you both tankiness and damage increase.
Another common item for any STR carry is the Halberd, which gives you good damage, a maim, evasion, more tankiness and an useful active which can shut down an autoattacker. This is a valid alternative to the Heart, you should always take this if you can't get so many kills.
This is one of the two items (the other one being the Mjollnir) that give you a lot of attack speed: this synergizes very well with your passive, Inner Beast, and will make you a feared ganker. If you are teamfighting take this, your team will need its aura.
I usually take the Mjollnir after a few late game items, that's because it can still be effective in the last stages of the game, too. Remember that you can use its active to deal some minor damage to the enemies that attack you: this can be useful if you are very tanky.
This item just gives you a ton of damage and a mini-bash which can damage the enemy even more every (about) 3 hits. Remember that the Monkey King Bar makes you deal true strikes, so take this if your enemies can avoid your hits with spells like Smoke Screen or weapons like Heaven's Halberd and Butterfly.
This is one of the most used late-game items, that's because it can help you in almost any situations if activated correctly. Never forget about the Black King Bar while choosing a late game item.
If your attack speed is high this item is what will make you almost indestructible: remember that the aura applies to the allied Heroes too and that it doesn't stack with the aura of the Assault Cuirass.
This item has a really low cost, but it shows its usefulness when you become tanky: if you have bought a Heart of Tarrasque or such, this will prove very powerful.
Well, this can be considered as a late game item, but I don't recommend it while carrying because you rely on your strength and damage to kill. If you have to destroy towers and barracks and your team fails to do so take this, else look for powerful items.
Common items that you should avoid while carrying:
You are not a support (or at least you are not playing as), so leave this item for your weaker Heroes. For sure you'll find the speed boost and the aura useful, but that's not enough as it obstructs your inventory.
This could seem a nice choice, but you should save money for items that are more useful. Your Phase Boots can give you some speed while activating them (if you have bought them), and you can use Town Portal Scrolls to teleport. Yes, the scrolls obstruct your inventory, but while reaching the very late game you won't need them anyway.
Usually, while playing in pubs there is at least one support that buys a Mekansm, but nobody buys the Pipe. So, should you buy it if no one else does? The answer is no, your other items can help you better.
In competitive matches, if you take Beastmaster you should never go to the mid lane: in fact Beastmaster could mid lane, but it would be a waste for the team. Only take the mid lane if nobody else on your team can go mid and if you expect an enemy mid laner that you can face.
Solo
lane:
For the same reasons don't go solo laning: you should babysit the hard carry and you don't need to farm either. If nobody in your team can solo lane don't try to do so: it's better to have a solo laner that can't solo lane and isn't helpful to the hard carry instead of you.
Remember that your Primal Roar can stun only one enemy: even if the other(s) will be slowed down they can still use their spells against you.
Safe
lane:
If you have to choose, always go to the safe lane (top for Dire, bottom for Radiant) with the hard carry of your team: you can creep pull to keep your carry safe and don't forget you can creep stack more than one camp at once.
Hard
lane:
If you are in the hard lane (bottom for Dire, top for Radiant), odds are there is already a babysitter in the safe lane or your carry is in the mid lane: this is not a bad choice, especially if you are trilaning with good players; it's better to support your carry, but you can surely by useful in this lane, too.
Off
lane:
If you are off-laning (or roaming) you can still keep up with your teammates if you manage to gank succesfully: always remember to scout the runes with the Hawk and take a Bottle instead of the Soul Ring. If you can roam this isn't a bad choice, but if you think the hard carry can't solo lane properly just support him.
When to pick Beastmaster
Well, Beastmaster is a good choice in almost every situation: he is a nice support and a good initiator, but he can become a ganker if your team really needs it, though it's not that easy to gank with him.
About your teammates, make sure that:
There are at least two ranged heroes in your team;
Your slow pairs well with the abilities of your teammates;
Your team has a hard carry which can't go solo mid;
Your team may need an initiator.
If you are worried about the enemies, pick Beastmaster if:
Your enemies suffer from the slow of the Boar;
Many enemies don't have escape mechanisms and rely on juking (you can cut trees);
You can counter-initiate.
If not all these conditions are met but you are very familiar with Beastmaster, you can pick him anyway as he's very flexible.
Know your role
Your role depends on the stages of the game: in the early game you should babysit your carry, but when you reach mid game you become a hybrid initiator-support.
When you are in the safe lane, always babysit the hard carry of your team: you can creep pull, cut down trees to discourage enemy ganks, harass the enemies and deny experience. Always try to creep pull, harass and deny when you are laning, it helps your team (and your lanemate) a lot. If the hard carry farms well he'll become an absolute beast in the late game.
When fights start you are the initiator, so you rely on your surprise effect to stun and slow the enemies with your Primal Roar: if you think your ultimate would be wasted use your Boar to slow one or more enemies, so that you and your teammates can easily reach and finish them off. If you have a Blink Dagger you should rely entirely on your initiator role: don't forget about the Pipe of Insight or the Mekansm you have bought, but always remember that if you have the Dagger your teammates expect that you will start the teamfights.
In teamfights focus on the most skill-dependent Hero, the one which can save his teammates or kill yours in a short time. If you stun him for 4 seconds the teamfight will be easier for you and your team.
At the same time, you are a helpful support which can make a gank or a chase much easier: use your Wild Axes and your Boar at your advantage, slow the enemies and nullify their attempts to juke. Don't forget about your support items (including both the Pipe/Mekansm and the Arcane Boots, if you have them) and always use them in teamfights.
You can mid lane if you want: if your enemy is not ranged you can easily keep up with them (even if he's a Pudge), but you should avoid this lane if you're sure the enemy team's mid laner is ranged.
Solo
lane:
Some people say that Beastmaster can solo lane: in fact it is possible, but also useless. As Beastmaster you don't always need so much experience and you could get caught if the enemies stun you. You can obviously avoid ganks cutting down trees with your Wild Axes, but if the enemy laners are in a numbers advantage you should leave this lane to another Hero.
Safe
lane:
That's not a bad choice, especially if your team's carry is mid laning: if you are laning with another support Hero you should farm: the support can save you from ganks and pushes, while in exchange you protect him cutting the trees behind which the enemies could gank him.
Hard
lane:
I'd say this is the best lane for a semi-carry Beastmaster: if you lane with a ranged Hero you can surely keep up with the enemies. Avoid ganks and let the ranged Hero harass the enemies while you deny experience for their carry.
Off
lane:
If you are off-laning (or roaming) you can still keep up with your teammates if you manage to gank succesfully: always remember to scout the runes with the Hawk and take a Bottle instead of the Soul Ring. If you can roam this isn't a bad choice at all.
When to pick Beastmaster
If your team needs a semi-carry or a hard laner you can choose Beastmaster, especially if those conditions are met. These are similar to the reasons why you pick Beastmaster as a support, but with slight changes.
About your teammates, make sure that:
There is someone that can take care of the hard carry or the carry is going to mid lane;
There are at least two ranged heroes in your team;
Your slow pairs well with the abilities of your teammates;
If you are worried about the enemies, pick Beastmaster if:
Your enemies suffer from the slow of the Boar;
Your enemies are mainly squishy;
Many enemies don't have escape mechanisms and rely on juking (you can cut trees);
You can counter-initiate.
Know your role
Your role as a semi-carry may vary depending on the objects you buy in late game. Also, in the early stages of the game you should behave more safely.
If you are laning focus on farming and on the enemies: if you know where they are, you are safe because they can't gank you; also, if you can deny experience, the enemies' carry will be weaker in late game. So, remember to farm, cut down trees and deny experience.
If you reach late game and you are going to buy a Blink Dagger or a Force Staff, you become your team's initiator. If so, always sneak behind the enemy lines while your teammates are following you, so that you can initiate and your allied Heroes can finish the enemies off. Also, if you rely on initiating you should go for attack speed-increasing items such as Assault Cuirass and Mjollnir.
As said in the "Playing Style: support" chapter, in teamfights focus on the most skill-dependent Hero, the one which can save his teammates or kill yours in a short time. If you stun him for 4 seconds the teamfight will be easier for you and your team.
If you buy tanky items (such as Heart of Tarrasque) you can still initiate succesfully and you will be very difficult to kill. If your HP pool becomes really large you can buy a Blade Mail to amplify the benefits.
A weird thing about Beastmaster is that he can effectively use a Bottle even though he doesn't go in mid lane: if a mid laner needs to get their core items really fast and if your carry in the safe lan can solo, you can switch into a sort of ganker and try to get the runes while killing your foes. Remember anyway that if you buy a bottle it doesn't mean that you must gank, you can still be a babysitter and solve your mana issues with it.
Talking about the runes themselves, this is how they affect you and how you should use them:
Double
Damage:
this is one of the best runes if ganking with Heroes that can stun or slow the enemy: the damage increase is really noticeable if you can land a lot of hits. Depending on the situation, it can be the best rune to take.
Haste:
Another great rune, it works better if the enemy has moved too far into your lane and your team can spam nukes or autoattacks, so that you can finish him off.
Regeneration:
This rune works well with all Heroes, it's always good to save one of these. Remember to use it before its time expires, or you will be forced to take it while you are fighting.
Invisibility:
In the early game Beastmaster isn't that kind of Heroes that rely on their surprise effect to quickly kill an enemy, so this rune is a bit useless. Still, an invisibility rune can be saved for escaping or to kill and already weakened enemy that doesn't leave his lane. It's never bad to see that an invisibility rune has just spawned.
Illusion:
I don't like this rune very much, it's less useful than the other ones. Anyway, you can use it in different ways, such as sending an illusion in lane so that your enemies think you are there while in fact you are trying to gank or are at your fountain. Overall, the illusions don't deal much damage but can be used as a bait or to confuse an enemy.
As Call of the Wild is used a lot of times and has low mana cost, you should use it as better as possible: it also has a pretty big cooldown, which shouldn't be a problem if your animals don't get killed.
I use the group keys in this manner, if you are used to group the creeps in a different manner that works for you feel free to skip this list:
Ctrl+1 for both the Boar and Beastmaster
Ctrl+2 for the Boar
Ctrl+3 for the Hawk
Spacebar (I changed it in the settings) for Beastmaster
When activating Call of the Wild I usually press 1 to direct Beastmaster and the Boar to the place I want, after that I move the Hawk pressing 3.
Now, a description on how to micromanage the two animals:
While moving the Hawk make sure it won't get killed: if the enemy Heroes kill it, they will gain about 50 gold. The enemy creeps can kill it, too.
After calling a Hawk always move it to one of the rune spots: if there are friendly wards in the rune spots, use the Hawk to prevent ganks by moving it behind the trees where ganks are common. With this, if you want, you can watch if Roshan has spawned and if the enemies are there.
Remember that if your Call of the Wild is level 3 or 4 your Hawk becomes invisible after being motionless for five seconds, making it as difficult to spot as an Observer Ward.
The Boar can properly slow an enemy at any level: as the game progresses you'll find it more and more useful, especially if your Call of the Wild is maxed out.
I usually move the Boar in conjuction with Beastmaster, using the group 1 (as said on top of this chapter), but sometimes I find more useful to move the Boar in a direction (with the group 2) while I run away or chase an enemy: if you can't micromanage effectively don't worry, after a few tries you'll get the hang of it.
When your skill is maxed out the Boar will slow the enemies' attack speed and move speed by 35%: it is more than 1/3 of their current speed, a big number.
When you die don't forget about the Boar! Its slow can be crucial to kill an enemy if there are teammates nearby.
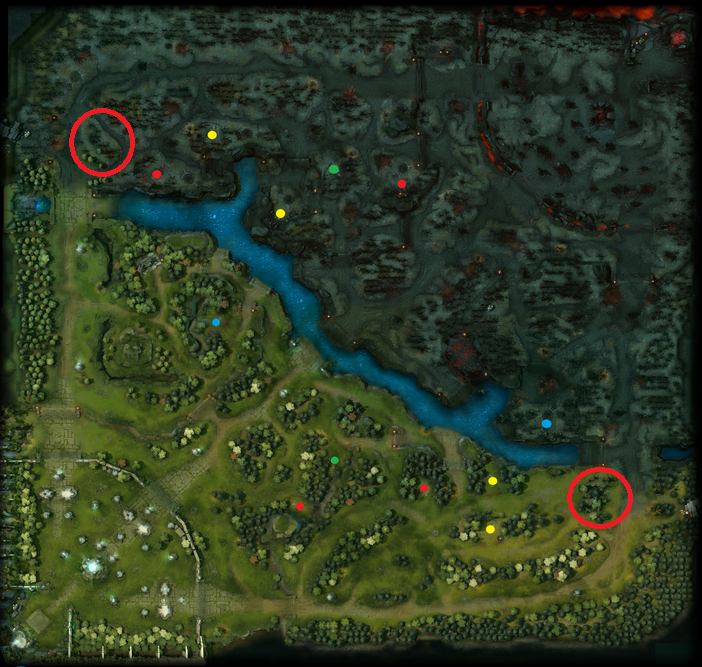
While playing Beastmaster you can easily destroy a huge amount of trees: use this at your advantage, cutting down the trees behind which your enemy could gank you.
Mainly you have to cut them down to gain more sight and to avoid common ganks, so that your hard carry can farm safely. Also, you need a bit of practice to cut them all in one hit: here there are a map which shows the trees to cut down and a video which shows how to cut them properly.
If your team's hard carry is someone who can farm really fast taking little damage, you can (and you should) stack the large ancient camps: you can use your Wild Axes to do so, even from a distance.
Let's take a closer look to Beastmaster's main ability, Wild Axes: as said in the "abilities" chapter it deals composite damage (also known as mixed damage), which is a type of physical damage that gets reduced by magic resistance but can hit magic immune targets (and ethereal units, too). You can obviously use it to stack the creep pull camps, but if you are roaming or laning near an ancient camp you should try to stack it as much as possible: while hitting even one of the creeps in the camp when the game reaches the ususal X:52, they will follow you and will stack, taking damage.
So, if you have any of the following Heroes in your team you should try to stack the camp as much as possible, because they will probabily buy a Battle Fury:
Though I hate Battle Fury on BH, I decided to add him because Gondar players always buy it. In my opinion it's still worse than many other items.
These Heroes have a lot of survivability thanks to their attack speed or damage coupled with a lifesteal item or skill, such as Helm of the Dominator, Vladmir's Offering or Vampiric Aura. You should stack camps even for them:
Skeleton King
Also, these Heroes can deal cleave damage thanks to their abilities:
Friends of Beastmaster are those Heroes that can deal (or make you deal) a good amount of damage during your stun: usually they are hard carries or heroes with a huge DPS count.
If you wonder who's the best hard carry that goes with this Hero, that's Morphling: in the competitive scene you don't see many other ranged hard carries, but it goes well with the following Heroes, too.
And lastly, there are some heroes that benefit very much from your tree-cutter ability, Wild Axes: they are fast gankers that rely on their speed or invisiblity.
Foes
Beastmaster has a few foes, since he can be played against almost every Hero. Remember, anyway, that in mid-late game you rely on your initiation capabilities to support your team, so you can be easily countered by silences.
While laning there are some enemies for which you're useless: Heroes that can go invisibile can escape from you even if you deny their juking, so be careful while dealing with them. They aren't real foes, you are just less useful against them.
coL vs Zenith - Game 1: coL.HANNAH_MONTANA playing the support with Pipe of Insight build.
coL vs Zenith - Game 3: coL.HANNAH_MONTANA playing the support with Pipe of Insight build.
aL vs MiTH - Game 1: al|MusiCa playing the support with Pipe of Insight build.
Support with Mekansm
LGD vs Orange - Game 2: LGD.Taobao.xiao8 playing the support with Mekansm build.
Semi-Carry
NextKZ vs EG - Game 1: eQual plying the semi-carry build.
Thanks for reading this, I hope you learned more about Beastmaster and the overall playstyle of supports and initiators. It would be nice if you gave a positive feedback, if you liked it.
Also, I'll end this guide saying this: play for fun, if you don't like supportive Heroes either don't play Beastmaster or learn to play him, enjoying the game. Dota 2 is one of the best games in developement, don't make it bad for you just because you want to be good with a Hero.
12-11-2012: Edited the skill build(s) and improved the readability of the guide.
12-11-2012: Added the "Stacking Ancients" chapter.
11-09-2012: Added the "Videos of Competitive Matches" chapter.
11-09-2012: Moved the "Cutting Down the Lane Trees" paragraph to its own chapter.
11-09-2012: Added the "Playing Style: semi-carry" chapter.
11-09-2012: Moved the "Runes Management" paragraph to its own chapter.
11-08-2012: Added a "Semi-carry" build.
11-07-2012: Added the "Cutting down the lane trees" paragraph in the "Playing Style" chapter.
11-07-2012: Added the "Micromanagement" chapter.
11-07-2012: Added the "Friends and Foes" chapter.
11-06-2012: Added the "Runes management" paragraph in the "Playing Style" chapter.
11-06-2012: Updated both the "support with Pipe of Insight" and the "support with Mekansm" chapters.
11-06-2012: Added the "Know your role" paragraph in the "Playing Style" chapter.
11-06-2012: Added the "Playing Style" chapter.
11-06-2012: Added the "Useful Terms and Links" chapter.
11-05-2012: Added the "Items explanations: support with Mekansm" chapter.
11-05-2012: Wrote the first part of the guide.
DOTAFire is the place to find the perfect build guide to take your game to the next level. Learn how to play a new hero, or fine tune your favorite DotA hero’s build and strategy.


 Animal Courier


Quick Comment (23) View Comments
You need to log in before commenting.