Insight (refreshed after 4 years) - A guide to Storm Spirit
Arterial
April 12, 2015
Introduction
Welcome to my  Storm Spirit guide!
In this guide, I am going to offer the most concise details about every single aspect of Storm. I wrote this guide because I couldn't really find an in depth guide on a hero that I've been playing for so long. I will try to give some insight that I have accumulated throughout the years of DotA. Enjoy!
Storm's foes and allies
Before you pick Storm Spirit, a few things should come to mind....
As we all know, no hero is perfect, and there are always counters to each and every one.
Lets begin on when NOT to pick Storm Spirit~
Silencers
- When you are considering Storm, try to look out for skills that could greatly hinder your performance. Heroes with Silences(such as
 Silencer, Doom Bringer,
  Drow Ranger,
  Death Prophet, etc..) could destroy your game with a well placed silence.
Things that could happen when you play against these heroes..
"You're at very low health, Silencer is chasing you."
Everyone knows that your ultimate is one of the best escape mechanisms in the game. You attempt to escape with this, but suddenly, GLOBAL SILENCE.. and you're dead.
"You are the best initiator on your team, you jump into the enemy team with Ball Lightning."
And then you get silenced. A silenced Storm is just a free kill for anyone to get.
Special Mention
 Clinkz counters you the same way you counter him. A normal build for Clinkz would be to rush an
  Orchid Malevolence. If he gets the item before you, don't wander off alone, or when the entire map is missing. If he manages to get the Silence on you, you are definitely dead.
Mana Burners
- These guys are also your greatest nightmares. A Storm Spirit without mana is free gold. If you are looking for some examples,
 Anti-Mage, and Nyx might be the first few to avoid.
Special Mention
 Keeper of the Light is also one of your greatest enemies. Not many people know this but,
  Mana Leak still affects Storm in
  Ball Lightning form. (In order for it not to affect Storm, you have to travel a huge distance within 0.5 seconds, which is only possible with help from items. Thanks to Antary for the amendment about
  Rupture.)
Strong/quick control
- A strong/quick crowd control is as bad as a Silence, except that its probably worse. Storm Spirit is one of the heroes with the worst base stats and stat gains, and getting controlled would often result in a quick death. Heroes that come to mind:
 Rubick and his
  Telekinesis,
  Lion's
  Hex,
Hex,  Beastmaster's Primal Roar.
Special Mention
 Bane deserves a special mention because of how detrimental his ultimate is to Storm players. While a fully channeled
  Fiend's Grip should often be sufficient in controlling a Storm, do note that the ultimate also drains mana during the entire duration.
Of course, when there are reasons not to pick him, there are also reasons to pick him. If your team has these heroes, Storm Spirit can be a good addition.
Mana Batteries
Strong Gankers
- Gankers with stuns and disables will ensure kills. Heroes like
 Vengeful Spirit,
  Sven, Lion and others will help you exert a lot of pressure onto the other team.
Pros / Cons
PROS
- Possibly the highest mobility in the entire game
- Has a skill with very low cooldown
- Not too difficult to use
- Can push decently, while still having hero killing power
- Strong mid to late game
CONS
- Huge mana consumption
- Bad mana management equals death
- Needs prediction
- DON'T PANIC ULT
- Very very hard to master
- Item dependent
- Disables will wreck you
Skills (perhaps the part that needs the most explaining)
This part is probably the chapter which deserves the most clarification, as the knowledge of the following should allow you to realize the full potential of this hero.
Storm is an intelligence hero, and he needs a lot of mana, therefore we should focus on building INT stat items as possible.
Incorrect.
 Static Remnant
Raijin creates a remnant of himself containing his essence. The Static Remnant will release its stored energy whenever an enemy unit comes near it. Lasts 12 seconds.
You should rarely depend on your Static Remnant for reliable damage. One thing that deserves attention is the mana cost. At level one, its only 70 mana. In my build, I max this skill last. If you max it too earlier, the mana cost will be too much for you to handle. Since it has such a low mana cost and cooldown, you can use it to last hit, and get an  Overload charge. (More explanation about Overload later.)
But Arterial, isn't this skill the only nuke for Storm, and isn't Storm a nuker?
Incorrect.
Firstly, Storm should not rely on his spell damage. Storm's main damage source should be his auto attack, which is usually an Overloaded hit. Before level six, your Remnants usually don't hit heroes. This is because your Remnants appear directly on where you are standing, and no one would want to walk on them. If you want them to land, you have to walk really close to the opponent hero, which means you have to take unnecessary damage. If you max Remnant, your laning phase would be horrible, as your lane would be pushed so far that you cannot farm creeps. Note that Static Remnant takes one second to materialize before it is active, and during the 12 second duration, it grants flying vision. Furthermore, even though the activation AOE is 235, the explosion deals damage in a 260 AOE.
 Electric Vortex
Storm focuses his energy to rip open vortex drawing an enemy to it. This process slows the Storm Spirit down for a brief period.
Your main disable. Pulls the enemy towards you, while disabling them during the period. Note that Storm is also slowed in the process. At level three, this skillcan usually pull the enemy into your Static Remnant, and this should be your bread-and-butter combination.
REMEMBER TO USE AN AUTO ATTACK BEFORE YOU CAST STATIC REMNANT IN COMBO WITH ELECTRIC VORTEX!
As mentioned before, a deceivingly large amount of your damage comes from your Overcharged attacks. When you use Vortex, you gain an Overload charge. If you use Remnant immediately afterwards, you are wasting an extra charge.
Overload
Storm Spirit becomes overloaded with electrical energy whenever he casts a spell. The charge is released on his next attack as an electrical burst, dealing damage and slowing nearby units.
A skill that is usually overlooked. At level four, it deals an extra 90 damage, while applying a 80% MS slow and a 50% AS slow for 0.6 seconds. This activates whenever you cast a spell, even if your auto attack projectile is in motion. Therefore, this skill is maxed first. (This doesn't mean that I don't take Vortex). As I mentioned in the previous skills, Remnants don't usually hit, and you usually use this skill to harass. With Overload, you can constantly harass your opponent with a charged attack (and sometimes even a second attack when slowed). Furthermore, as you usually use Vortex and Remnant in succession, Overload is charged twice.
Ball Lightning
Storm Spirit becomes enveloped with energy, losing his physical form, and travels until he depletes his mana or reaches his target. While in this form, he deals damage to nearby units based on how far his electrical form has traversed. Damage, speed and area of effect improves per level.
Storm's signature skill. There isn't a skill that shows the slightest resemblance when compared with Ball Lightning. You can use this skill to deal damage, escape, initiate, avoid projectiles, and a lot more. Answering the previous question, why should we build INT stat items? The reader that attends to details would have realized that Ball Lightning uses mana based on a percentage. To put this bluntly, the more mana you have, the more mana it needs. Therefore, we should build items with mana regeneration, instead of items with flat INT stats. A counter-productive item would be  Eye of Skadi. During late game, you will never run out of mana from using your first two skills. However, if you buy a Skadi, your mana usage for Ball Lightning skyrockets, which in turn, lowers your total efficiency.
Note that I still pick  Shiva's Guard. This is because items and spells can be used during Ball Lightning. This may seem like a small factor, but these split second decisions can change death to life. If you activate Orchid Malevolence on your target before you hit, you deal an extra 25% damage.
Trivia
In DotA, if Ball Lightning deals the killing blow on an enemy, you do not gain as much experience as you usually do. This is because in programming, an invisible and seemingly nonexistent Storm Spirit "clone" is made during Ball Lightning, and it also shares the experience with you.
Just an extra bit about the awesomeness of Ball Lightning
Most people decide to play Storm Spirit because of his ultimate.
As I have mentioned before, it has so many uses. You can escape, chase, deal damage, and do whatever you want.
But now, THINK OUT OF THE BOX!
When playing Storm, critical thinking and thorough planning are both very important. For example, no one expects you to fly half a map to accumulate damage for your ultimate. No one expects you to steal Roshan and get away with it. No one expects to see someone charging from impassable terrain.
Utilize this element of surprise to your advantage. A good Storm player can and should play mind games with the opponent. Just when that Vengeful Spirit thinks she can kill you with a  Magic Missile, use your ultimate to dodge it. Even if you see that your mana is so low that you can barely initiate your ultimate, still try to time the your ultimate, so that you don't waste your last speck of mana. Sometimes, a half second Ball Lightning can save you from a
  Fissure of death.
Lane Matchups (Solo-Mid)
In this section, I will be discussing how you should face the common mid-laners. Yes, dual mid is a thing, but I will not be commenting on that. One thing to remember is that for most of the below matchups, the difficulty will greatly drop after you get your Orchid Malevolence.
 Queen of Pain
Difficulty: Very Hard
Being solo against Queen of Pain is definitely going to be painful(pun semi-intended). It would be quite difficult to win the lane against her. The ideal situation would be for you to reach Level 6 before her, but this would prove to be very difficult. Don't bother trading damage with her, your Static Remnants have no chance of hitting. The only reasonable way of getting damage on her is to farm with your Remnants, and attacking her with your Overloaded attacks. Try to stay out of  Shadow Strike's range, you really do not want to get hit by it. Have Ball Lightning ready if you really want to try killing her, even though it would be really difficult (unless you have a huge mana pool). Be careful when she has her
  Sonic Wave ready, you do not have enough HP to survive one combo.
 Nyx Assasin
Difficulty: Very Hard
NA is the bane of all low HP Intelligence heroes. Unfortunately, you are one of them. The funny thing is (ignoring skill reworks and changes), NA has been buffed in nearly every patch. The only up-side you have against him is that you are ranged while he is melee. Even though it would normally be a bad idea, try keeping your mana pool low when you are laning. Force him to get hit by Static Remnant and Overload when he tries to farm. (Be careful, he can activate  Spiked Carapace and simply walk into your Remnants, and you would be in big trouble.)
  Impale has an insane duration and range (its longer than the actual cast range), so try to stay out of it's way. BE EXTREMELY ALERT WHEN HE REACHES 6! Alert your teammates as soon as you see him missing, and be very careful yourself, as you might be his target altogether in the first place.
Silencer
Difficulty: Hard
Silencer has become a very strong laner since  Last Word was reworked into an active skill instead of a passive aura. This is a good and bad thing. The good thing is that he can no longer silence you whenever you use a spell, which means you won't be interrupted in your combos. The bad thing is, the duration of the silence is a lot longer, and now Last Word deals damage (quite a lot of damage, in fact). Most of the time, you should use a spell when he casts Last Word on you, as you will not get disarmed if you do so. You will take the damage from Last Word no matter if you cast a spell or not. Don't trade hits,
  Glaives of Wisdom deal more damage than your auto-attacks. If he uses Curse of the Silent, use Remnant to dispel the debuff, it will save you HP and Mana in the long run. Again, try to reach Level 6 before him. You can't fight him when he has
  Global Silence ready. Moreover, be aware of when he has it ready, as he can bait you into a very bad situation, then cast Global Silence.
 Templar Assassin
Difficulty: Medium
TA doesn't really have what it needs to kill you, mainly due to her short auto-attack range and lack of real control. However, be careful of her  Psi Blades bounce, the bounce is pure damage. Don't use Electric Vortex to pull her to you, she will do more damage back to you. Try harass with auto-attack and loaded attacks, but don't bother trading when she has
  Refraction on. She has no way of getting close enough to damage you without you noticing, and even after 6, you can Ball Lightning away if she slows you with her
  Psionic Traps. Check her inventory every now and then, and be a bit more alert when she has her
  Blink Dagger.
 Nightstalker
Difficulty: Medium
Nightstalker poses no threat during the morning (you don't say), but it's really hard to force him out of a lane due to his innate bulk. Be very aggressive in this lane, he has no way of punishing you back during the morning. Force him to use  Void to farm, and keep his mana pool low. As he is a melee hero, make him eat your Remnants when he needs to farm, and when you see an opening, chain your combo together and try to net a kill. When you reach the nighttime, he turns insanely hard to face, and I would suggest you change lane when this happens. During the night, he has a huge MS and AS boost, Void's slow is strengthened, and most importantly,
  Crippling Fear makes you entirely useless. A good Nightstalker will use Void to harass you until you are low enough, in which he silences you and kills you before you can Ball away.
Lion
Difficulty: Hard
Lion has a lot of early game potential, and might just kill you before you even reach 6. Due to his aggression, he should have an earlier 6, which can be very very dangerous for you. Farm passively, don't fight him unless you are extremely positive that you can take him down, and try to leave some mana for you to Ball away in times of trouble. A good Lion player will skill  Mana Drain just to screw with you, and there is really not much you can do if he stuns and drains you. Attack him only when he has spells on cooldown, or you can see that he does not have enough mana to blow his entire movepool on you. Remember, a Level 1
  Finger of Death already deals 600 damage..
 Pudge
Pudge
Difficulty: Easy
Laning against a Pudge has never been a difficult task (Pre-6, that is). Make him eat Remnants when he last hits, but try not to pull him in unless you are looking for a kill. Pudge is exceptionally tanky, and a Level 1  Rot already has a 20% slow, making it hard for you to escape. Be careful when he hits 6, as he has enough damage to kill you from full health. Try to stand between him and a creep, or simply stand out of his hook's range. You should be fine if you do so.
 Shadow Fiend
Difficulty: Really depends on the player
Laning against SF really depends on how good your opponent is. If he is a good player, you will get completely decimated at Level 5, and if he is bad player, you will completely decimate him at Level 5. Use Electric Vortex when you want to deal damage to him, as you have no other way of making him walk into your Remnants. His health pool is quite low, which makes killing him a doable thing. Try to be aggressive, but not too aggressive, as SF is famous for punishing overconfident players. Try to kill him at Level 6, as you have a game-changing ultimate, while he does not. (SF players never skill  Requiem of Souls until Level 9 or 10.) Don't get too cocky though, SF is also notorious for being able to get back in the game despite a very weak early-game.
 Batrider
Difficulty: Hard
Batrider is a very strong laner, no doubt about that. Get a  Magic Stick or
  Magic Wand as soon as possible, it is the best available way to counteract his
  Sticky Napalm. Try to beat him to Level 6, which again, will be quite difficult. ALWAYS BE AWARE OF HOW MANY STACKS OF OIL YOU HAVE ON YOU. As a rule of thumb, always back off when you have 5 or more stacks, and consider backing off when you have 3 to 4. He can solo you when he reaches 6, and chances are, you will be dead during the duration of
  Flaming Lasso. When he reaches 6, try to stay out of his ultimate's casting range (he needs to be in almost melee range to do Lasso you).
 Bloodseeker
Difficulty: Medium
Bloodseeker is known for his sustain, and if he builds a  Poor Man's Shield along with a
  Quelling Blade, harassing him would be quite futile. However, there is one thing which keeps you safe most of the time. If he maxes Blood Bath, he won't have enough MS or damage to kill you off. If he maxes
  Thirst, he won't be able to sustain himself if you are aggressive enough. One thing to keep in mind, Rupture does not damage you when you use Ball Lightning. A good Strygwyr will silence and Rupture you at the same time so you can't Ball Lightning away. If (and only if), he Rupture's you without applying
  Bloodrage's silence, consider fighting him back, as you have a great chance of out-damaging him.
 Viper
Viper
Difficulty: Medium
Viper doesn't counter you as bad as he counters others heroes, mainly because all of his spells are slows and DoTs (damage over time). His Orb attack ( Poison Attack) hurts pretty hard, and if he Orb-Walks you (using the Orb as a spell instead of an auto-attack modifier), he can damage you without drawing aggression from the tower or the creeps. Moreover, his passive
  Corrosive Skin gives him innate Magic Resist, while slowing and damaging you when you attack him. Try to stay near max health, as this reduces the effectiveness of his
  Nethertoxin. Try to trade hits before Level 5. This is because his Orb effect has a cooldown when it is lower than Level 2. When he reaches Level 3, the Orb effect's cooldown is removed, which means that trading will hurt you a lot more. Ball Lightning can be used to dodge his ultimate,
  Viper Strike, and to block a few ticks of the DoT he dishes out.
 Invoker
Difficulty: Really depends on the player
Similar to Shadow Fiend, laning against an Invoker depends greatly on two things. One, the skill level of the player. Two, which Invoker build he is going for. As most pub players usually go for the greedy Quas-Exort build, you should pay more attention to your early and mid game. Even though I would say Quas-Exort isn't the best Invoker build, it has a lot of solo-killing power. Invoker has a better attack animation and range, so try to just farm. Unlike most heroes, Invoker's power does not have a sudden increase at Level 6, while yours does.  Cold Snap has a huge casting range, and be careful of this spell when you dive him (as you will draw creep aggression). Moreover, be aware of
  Sun Strikes when you are low, don't walk in obvious paths. Try kill Invoker before he reaches a second Level of
  Invoke, as before that, he can only have one spell saved in his arsenal.
 Zeus
Zeus
Difficulty: Medium
Zeus has a lot of early game damage, but he really has no way to keep you in a certain place. The lack of a real stun (except the ministun from  Lightning Bolt) makes it easy for you to escape from his grasp. Trade with him as early as you can, his auto-attacks are just pathetic. Try to deny as many creeps as you can, so that he either loses experience or is forced to use skills to farm. If you get an earlier 6 (which you should), you can have a try at killing him, as he has no escape and not enough damage to take you down. Even though its quite difficult, you can try to dodge
  Thundergod's Wrath with your Ball Lightning, as it renders you invulnerable and untargetable.
 Tinker
Difficulty: Medium
Your main aim is to force him out of his lane. Tinker has a very flexible build, and your playstyle should change according to his build. If he is a burst Tinker, in which he maxes  Laser and
  Heat Seeking Missile, try to force him out of the lane (don't forget the Blind effect of Laser). If he is a pusher Tinker, in which he maxes
  March of the Machines, try to pull your creepwave as far back as possible, so that he will have to lose farm and experience. Killing him would be easier if he goes for the pusher build, but no matter which build he goes for, his first item should be
  Boots of Travel. Similar to TA, keep tabs on his inventory, and try to delay the boots as long as you can. Try not to fight on top of a March, its damage is deceivingly high.
 Warlock
Difficulty: Medium
Warlock's playstyle usually revolves around teamfighting, and if you can bait his ultimate before a teamfight, that would be extremely beneficial for your team. However, do not underestimate the damage from  Fatal Bonds and
  Shadow Word, as they can bring you really really low. Warlocks are usually very passive before 6, as they really don't have a reliable way of killing you. Try to get an earlier 6 to kill him, even though his heal is usually enough to bring him to a healthy amount of HP.
Items (another part that needs a lot of explaining) (also a bit about Bottles and Runes)
Starting items


The starting items are pretty self explanatory. Three GG branches for some cheap early stats (and a possible
Magic Wand),
Tangoes for recovery. The rest of the money is saved up for an early bottle.
How come you buy Tangoes when you can buy Salves?
VS

Normally you would go solo mid. You will never leave the lane (unless for runes) in the early game, and every second in the middle lane is precious. If you don't get the experience from the lane, no one does (unlike bot or top lanes, as they are usually dual lanes).
Healing Salve costs 15 less, while healing 60 less hitpoints. However, as the Salve can be dispelled, you usually have to stay back for the entire duration. This is not true for a Tango, even though the HP recovered is a lot slower.
Early/Mid game items


I usually go for
Power Treads. Why is this? The extra Strength/Intelligence can come in handy during early to mid game, and since your main damage comes from auto attacking, the attack speed is not wasted either.
Bottle gives good regeneration, can be refilled with runes, and can be used to store runes.
Magic Wand can provide a burst heal in health or mana, which can save your life in so many cases. Buy a
Flying Courier if nobody in your team buys one, as Bottle-Crowing can give you a lot more Regeneration.
BOTTLE-CROW
Bottle-Crow is a fast way to get some more regeneration. What do you do when your bottle charge is empty, and there are no runes that are about to spawn? Bottle-Crow. Your bottle automatically refills itself in the fountain (you can mash your bottle in the fountain to save time). Therefore, you can use the courier to pick up your empty bottle, fly back to the base (refill bottle), then deliver the bottle back to you.
REMEMBER TO CHANGE TO AGILITY TREADS BEFORE USING BOTTLE, AND CHANGE TO INTELLIGENCE TREADS BEFORE USING SPELLS!
Normally, Strength Treads are the default. You have an extra bit of HP due to this, and it can save you quite a few times. However, when you use bottle, remember to change to Agility Treads. When you change to Agility Treads, you don't gain extra HP (Strength), nor do you gain extra MP (Intelligence). As the
Bottle heals a flat amount of health and mana, using it in the other modes will heal a smaller percentage. If you use it in AGI Treads, THEN change to either of the other two modes, you will gain a small amount of HP/MP, as you healed a greater percentage in AGI mode.
A bit more about Bottling and Rune Control
Rune control is an important part for most mid-heroes, Storm included. As quite a lot of mid players will pick up a bottle as their second or third item, missing out on a rune can be quite fatal. You lose the Rune effect, and more importantly, the Bottle charges. This "deficit" is shown even more clearly because you are not only losing these precious effects, but your opponent laner is gaining them. I'll talk a bit about the runes usage.
Regeneration
Regeneration is one of the best runes you can ask for. You can rejuvenate back to full health and mana, while still having 3 charges in the Bottle as backup. Moreover, as the Regeneration duration is extremely long and as long as you are not damaged or at full HP and Mana, you will keep regenerating. This means you could spam your Ball Lightning and spells without really worrying about the Mana. Just remember not to get hit at all.
Invisibility
Invisibility isn't a bad rune for anyone, and is quite a strong rune for most gankers. Invisibility helps you save the mana that you would have used to jump into an engagement, and you can appear at an engagement instantly. If you can, try to walk directly above your target and cast a
Static Remnant instead of catching your target with an
Electric Vortex. This is because of Remnant's low cooldown, meaning that you might be able to Remnant-Overload-Electric Vortex-Overload-Remnant-Overload. Note that you can use one Bottle charge directly after Invisibility without breaking it.
Haste
Another good rune. Haste gives you max move speed in the entire duration, meaning that it counteracts
Electric Vortex's self-slow. Moreover, it would be a lot easier for you to hit your Remnants without other skills, and Ball Lightning use can be minimized again. Just don't overextend with a Haste rune, stuns and snares still apply.
Illusion
The worst rune you can get for Storm Spirit. You will mainly use it for the Bottle charges. However, you can trick other players with your illusions, as most pub players will instantly throw their disables when they see a Storm coming too close. You waste their mana, and you create a chance for you to kill them while there CD's are still up. If you don't want to do so, you can still use the Illusions to scout for the next rune, and deny it if your enemy will reach it before you.
Double Damage
Quite a good rune again. As mentioned before, a portion of Storm's damage is from auto-attacking. There isn't a change in how you gank when with a Double Damage rune, it's just that you will kill the target a lot faster than you thought you would. Even if you are not ganking, it helps you harass the enemy laner, and makes denying and farming a lot easier.
Extension


I usually go for a
Linken's Sphere instead of a
Bloodstone. Why? Lets compare them later.
Orchid Malevolence gives decent mana regen, attack speed, damage, intelligence, and most important of all, an active silence along an amplification.
Black King Bar is just self explanatory, blocks spells when you are in combat.
VS
Linken's Sphere gives some stats for each of the three spectrum, and 150% mana regen. It also adds a bit of damage. Bloodstone gives more flat HP and flat MP, has an increase in HP regen, and 200% mana regen. Linken's Sphere has an active which blocks a spell every 20 seconds. Bloodstone increases MP regen per stack, decreases respawn time, heals teammates, and loses stacks on death. Both of the items have their own strengths and weaknesses. I think Linken's is the superior one, as it blocks a spell every 20 seconds (which is so useful when initiating). In order for Bloodstone to be fully effective, you need to kill, and you need to die, which are two things that are easier said then done. Some people say that Black King Bar and Linken's are a bit redundant. But remember, Linken's can block spells that go through Avatar.
Luxury

 Daedalus
 gives you an increase in attack damage, which is very useful late game. In late game, your skills start to tickle instead of actually doing significant damage, and critical hits along with
Overload can solve your problem.
Shiva's Guard has an active nuke and slow, and also increases armor for the frail Storm.
Scythe of Vyse is just a must for any Int hero (and even certain non Int heroes). The stats and regen are awesome, and it's active is just overpowered.
Situational


dagon

Even though I mentioned that building flat mana is a bad idea, I would say
Arcane Boots is an exception. This is because of four reasons. One, Arcane's active gives you mana, which is similar to mana regen. Two, Arcane's is easier to obtain than
Power Treads when you are in mid-lane, which you should be. You can just walk into Roshan's pit and buy the
 Energy Booster
. Three, Arcane's is an early game item, when the mana you use in your normal spells should be more than
Ball Lightning, which means that the flat mana will not hurt you as much. Fourth, and most importantly, you can disassemble it and build it into a
Bloodstone if you need to. When you disassemble the boots, and you realize most of your slots are full, the next logical choice would be to buy
Boots of Travel. You should always be able to teleport, I should not need to emphasize this point.
Eul's Scepter of Divinity is a cheaper disable, and the ability to disable yourself can come in really handy (especially when you have so little mana that
Ball Lightning can't save you. Since technically you should be in most fights (due to your mobility), an
Urn of Shadows is a good choice, as it gives you some necessary HP, and mana regeneration, while having a very useful active to heal yourself or to secure a kill. Note that if one of your teammates already has one, it does not stack, and only one of you can get the charges. Dagon achieves the purpose of killing the target quickly, and escaping quickly as well. (Don't use it to KS, your teammates will hate you.)
Rod of Atos's active slow helps you catch up to your target after you have used your
Electric Vortex, so that you do not have to waste your mana jumping around,
Creeping / Jungling
Yes, you read that correctly, Storm can jungle.
And he can Jungle efficiently. Very efficiently.
But in order for that to work, you first need to know a bit about the basic mechanics of DotA (and DotA 2 of course). First, take a look at the picture.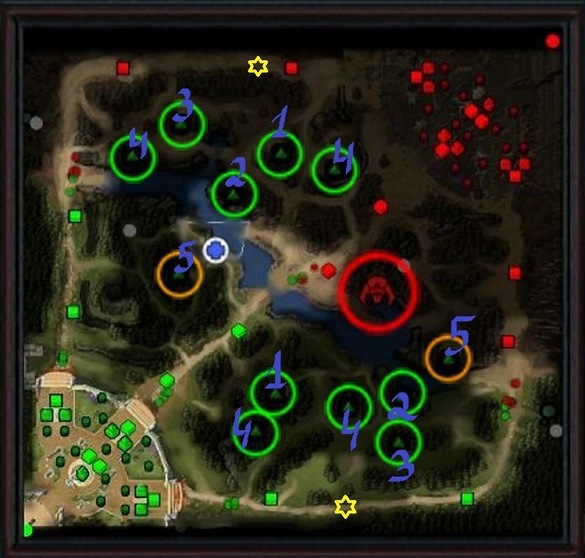 From the picture we can see that there are 12 camps, 2 small camps, 4 mid camps, 4 large camps, and 2 ancient camps. We should focus our attention on any camp bar the ancient camps.
Creep Stacking
Creep stacking is a skill used in higher level matches. Ever found clearing camps too easy? Ever thought that Static Remnant is a waste of mana when you can only hit a few creeps in the camp? Then FEAR NOT! Creep stacking can help you! Creep stacking is just pulling the aggression of the camps so that the jungle creatures will follow you out of their designated spawn point. If you manage to pull them out of their spawn point at X:00 time (X can be any number greater than 1), another camp will spawn in the point, and when the jungle creatures that were chasing you returned to the original point, there will be two stacks. (Remember, you can stack more than two.)
If you stack a few camps, you can quickly clear them with your low cooldown, low mana, high damage AOE nuke. If you are opting to do this, remember to max Static Remnant instead of Overload, so that you can clear that camps quickly. Furthermore, if your support is free, tell him/her to do the dirty work for you (after all, you will contribute to the team more than the support, right?)
But Arterial, won't that jungle creeps kill you before you kill them? (Especially with so many of them @.@!)
FEAR NOT, for you have  Smoke of Deceit. After stacking a certain amount of creeps, activate Smoke, and then start clearer them up with Remnants. Because of the Smoke, creeps will not be able to see you (even after you cast a spell), so you can clear multiple camps in a short duration without even getting hurt.
Some small tips about jungling.. (Well actually it's quite important and I doubt you'll find it in other Storm guides..)
Quoted from http://www.playdota.com/learn/jungle
"General Information
- The first wave of neutral creeps spawn at 0:30
- After this, neutrals will spawn at each camp on every minute (x:00)
- Creeps will not spawn if a unit is within a certain rectangular area of the given creep camp at the next minute mark
- This includes your hero, any creeps (neutral or otherwise), wards and DEAD creeps (that leave a corpse - a creep takes between 15 and 20 seconds to disappear, so if you kill a camp at x:55 leaving a corpse in the area, the next wave will not spawn)
- All neutral creeps have some AI (some are "smarter" than others)
- higher level creeps (level 5/6) will attack a low hp hero rather than creeps
- predictability of neutral creep AI will allow you to jungle effectively
- High level Centaurs/Furbolgs will use their stomps when 3 units are at melee range
- High level Satyrs will send out a shockwave when 2 units are in range of the wave (careful of chicken!)
- Neutrals can be "kited" by ranged heroes due to their predictable aggression patterns
- Since neutrals will not respawn at the designated time if units are in the area, you can pull the neutral creeps out of this area and make an additional camp (creep stacking) by engaging the creeps and then running out of the area"
Summary
Well, that's it for now. I hope you enjoyed reading my Storm Spirit guide~
I'll update this guide whenever I feel the need to.
Practice makes perfect, try out the methods that I have mentioned in this guide, and wish you luck.
"When a warm front and a cold front love each other very much...a storm is born! " - Storm Spirit


Quick Comment (22) View Comments
You need to log in before commenting.