AngeloBangelo's Guide to Support Lion
AngeloBangelo
August 4, 2014
Introduction
You summon the Demon Witch.
Hi there! My name is Angelo. Welcome to my Lion guide. I've played Lion from the beginning of DotA 1, and he has always been my favorite hero. Even through my days of Heroes of Newerth, my #1 played was Witch Slayer (Their adaptation of Lion). What attracts me to this hero? Well, he is an incredibly active hero. You need to move a lot, because he is amazing at ganking. He benefits the most from what I would consider a more advanced playstyle. Most support heroes can benefit from smoke ganks, or a clutch town portal... But no hero can stop a DPS hero in it's tracks, turn around a tower dive, or burst down key heroes in team fights like Lion can.
Be warned, this is my first DotA guide. It may not be pretty. I'm mainly making it because I see a lot of cool kids do it, but also because Lion doesn't get enough love.
Note: Lion is also a somewhat viable mid. Finger is very dangerous, and getting it when a tri lane is still level 2-4 makes it that much scarier. However, I don't think it's Lion's best role. I think he is a great support, and that's what I have the most experience as when playing him. If you're looking for a guide on Lion mid, you will have to look elsewhere.
Lion's Awesome Backstory
When the demon betrayed me, I took its very arm. Imagine what I'll do to a mere hero.
Once a Grandmaster of the Demon Witch tradition of sorcery, Lion earned fame among his brethren for fighting on the side of light and righteousness. But adulation corrupts. With powers surpassed only by his ambition, the mage was seduced by a demon and turned to evil, trading his soul for prestige. After committing horrible crimes that marred his soul, he was abandoned. The demon betrayed him, striking better deals with his enemies. Such was Lions rage that he followed the demon back to hell and slew it, ripping it limb from limb, taking its demonic hand for his own. However, such demonoplasty comes at a cost. Lion was transfigured by the process, his body transformed into something unrecognizable. He rose from hell, rage incarnate, slaying even those who had once called him master, and laying waste to the lands where he had once been so adored. He survives now as the sole practitioner of the Demon Witch tradition, and those who present themselves as acolytes or students are soon relieved of their mana and carried off by the faintest gust of wind.
So Lion is a great guy, right? Commended constantly. 10/10 mentor! Then he wants more power. He makes a deal with a demon for that power. Then he gets betrayed by the demon, so he follows it back to hell, kills it, and wears it's arm. Now he zaps people with it. I think we both know who the coolest hero in the game is.
The good, the bad, and the killstealing
All hell's broken loose, and I hold the pieces
Trust me, I'd love to say Lion is the perfect hero. I'd love to say "Lion is considered by most professional players to be the strongest hero in the game!" but that would be a lie. The truth is: Lion works against unorganized pubs, but he can only excel in REALLY high tier games when given certain allied heroes, and when he is faced against certain enemy heroes. Now when I say "High tier", I mean tournaments with a lot of money on the line. For normal players, or players entering smaller tournaments (With say... Only a few 1,000 total prize pool) Lion is still VERY viable in most line ups!
Pros
- Best single target disable in the game
- One of the few "instant" disables (no cast animation)
- Amazing burst capabilities
- Only needs boots and wand to do well
- Infinite mana allows for A LOT of missed spells (If you're a beginner)
- Great intelligence gain (Among the top 10 in the game)
|
|
Cons
- Countered by Black King Bar (BKB)
- Weak health pool
- EXTREMELY position dependent! If you aren't positioned correctly...
- Easy to pick off. Usually the first target in team fights.
- Countered by Black King Bar (BKB)
- I'm not kidding. BKB makes you worthless.
|
Lion Champ stronk spells!
Earth Spike
The Demon Witch exercises his demonic covenant, opening a fissure from hell
|
|
|
Type:
Targets:
|
|
|
Active
Target Point
|
|
|
Rock spikes burst from the earth along a straight path. Enemy units are hurled into the air, then are stunned and will take damage when they fall.
|
Level
1
2
3
4
|
|
|
Mana
100
120
145
170
|
|
|
Cooldown
12
12
12
12
|
|
|
Range
950
950
950
950
|
|
|
AoE
125
125
125
125
|
|
|
Stun
1.02
1.52
2.02
2.52
|
|
|
Damage
60
130
200
260
|
Notes:
- Hit units will fly for 0.52 seconds before the real stun is applied (included in the duration on the infobox to the left).
- The rock spikes travel for a length of 825 units, and hit units in a 125 radius around this line, therefore enemies at a distance of 950 units are hit
- The skill can only be targeted at a range of 500 units on enemies or the ground, but hits units up to 950 units away
- The wave of tendrils moves at 1600 units per second.
- If Earth Spike hits an invisible unit the damage graphic is still displayed.
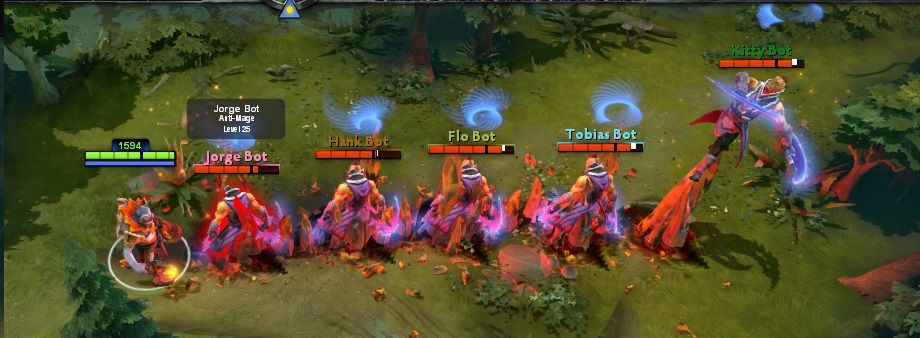
Earth Spike is a straight line stun. This is one of the main reasons Lion benefits so much from a blink. When enemies focus a single unit, they tend to line up. If you're able to instantly change position and stun a few heroes from that line, it can turn the tide of a team fight. This is normally your follow up stun, and what I mean by that is that when you're disabling a target you will normally want to start with hex, then impale when hex duration is over. The spike itself has an odd range/graphic correlation. The cast range is 500, but the actual spike extends 850 range away. The stun range extends PAST the graphic, so you can actually stun people 950 range away. The spike has a width of 125. In the picture below I am clicking to stun the first Anti Mage, and stun all five heroes. If I try to manually click the last Anti Mage to stun him, Lion will walk forward and stun the last 3 Anti Mages because of the low cast range.
Hex
Lion is compelled to share his transfiguration, twisting the essence of those who oppose him.

|
|
|
Type:
Targets:
|
|
|
Active
Enemies
|
|
|
Transforms an enemy unit into a harmless beast, with all special abilities disabled.
|
Level
1
2
3
4
|
|
|
Mana
125
150
175
200
|
|
|
Cooldown
30
25
20
15
|
|
|
Range
500
500
500
500
|
|
|
AoE
N/A
N/A
N/A
N/A
|
|
|
Duration
2.5
3.0
3.5
4.00
|
|
|
Damage
0
0
0
0
|
Notes:
- Instantly destroys illusions
- The target will have a base movement speed of 100
- Hex disables damage block and evasion.
- Hex disables experience gain.
- Read the above. I mean... wtf?
Hex is amazing, period. Easily your best skill. Hex was changed recently (I personally think it was a buff, but I suppose it's a matter of opinion). The hex duration is roughly 0.5 to 0.75 of a second longer depending on the level, but the cooldown is approximately doubled for most early levels. Hex disables experience gain, which is very unique for a tri lane. If there's a hero that relies getting a fast 6 (Let's say a Wisp), you can hex when large creeps are killed like siege units. You can also defensively hex heroes during ganks (If you haven't used it already) like the mid or something as an ally dies to deny that hero exp. It's a unique mechanic that shouldn't necessarily completely change how you play Lion (especially with the 30s CD), but it allows you to make consistent subtle plays to deny exp. Hex is instantaneous; it has no cast animation. Just... BAM. You're a frog. This makes it excellent against heroes with built in escape mechanisms like Storm, AM, QoP, etc... Hex disables most passives as well. So if you're against an AM and finger does nothing versus him, hex first. If you're against PA and blur is ruining your MKBless Clinkz, hex first.
Mana Drain
Lesser magi are nothing more than a source of magical restoration for the Demon Witch.
|
|
|
Type:
Targets:
|
|
|
Active
Enemies
|
|
|
Absorbs the magical energies of a target enemy unit by taking mana from it every second.
|
Level
1
2
3
4
|
|
|
Mana
10
10
10
10
|
|
|
Cooldown
20
15
10
5
|
|
|
Range
850
850
850
850
|
|
|
AoE
N/A
N/A
N/A
N/A
|
|
|
Duration
5
5
5
5
|
|
|
Mana per second
20
40
60
120
|
Notes:
- Destroys Illusions after 0.25 seconds
- Can continue to drain as long as the target is within 1200 range from Lion and they remain visible.
- Total mana drained (100/200/300/600)
Mana drain received huge buffs recently, and in my opinion it is absolutely worth maxing now. Even over your hex. Why max mana drain over hex? For most situations mid game the amount of disable that Lion exhibits is more than enough to successfully kill a hero. Early game the extra time from hex doesn't contribute much because heroes lack DPS to utilize the hex properly. Why is Lion not picked up competitively? His spells cost way too much mana, which requires very careful mana management if you don't want to go back to the fountain every few minutes. He lacks the DPS to really kill a hero from full health in a tri lane. Hex doesn't take off until late game when carries have their items. Mana drain allows you to use your spells more freely and more frequently without as much mana management, allowing you to contribute more to your tri lane. This is also the PERFECT spell to take off a Linken's Sphere because of the low CD and low mana cost!
Finger of Death
Lion's disfigured hand is also the source of his greatest power, capable of flooding victims with malefic force.
|
|
|
Type:
Targets:
|
|
|
Active
Enemies
|
|
|
Rips at an enemy unit, trying to turn it inside-out. Deals massive damage.
|
Level
1
2
3
4
|
|
|
Mana
200
420
650
625
|
|
|
Cooldown
160
100
40
20
|
|
|
Range
900
900
900
900
|
|
|
AoE
N/A
N/A
N/A
200
|
|
|
Duration
N/A
N/A
N/A
N/A
|
|
|
Damage
600
725
850
1025
|
Notes:
- Finger of Death has a 0.25 delay before the damage is applied after the spell is cast, allowing certain abilities to avoid the damage.
This is the main reason Lion is so scary early game. Once he's 6, it's almost a guaranteed kill on a hero of your choice. The moment you hit 6, you need to immediately decide who you're going to kill. The cooldown is very long, so you need to cast it ASAP. If you cast it immediately after 6, it will be available sooner than if you had waited to use it. This is a general rule for big ults, but it certainly applies to Lion. Use it quickly and effectively, and it will have more impact on the game, as may be able to cast 15 ults opposed to 10 if you're not as active (Changing the game more). If you're planning to kill someone in lane, start to soften them up with auto attacks when you're 3/4 or 4/5 away from leveling depending on the HP pool of the hero. This skill CAN be disjointed by Euls, SD's Disruption, Juggs ult, etc etc... So be very careful when using it. Good players can dodge it, and they WILL dodge it unless they are stunned when you cast it.
Like Lion's other skills, Finger has been buffed recently. First of all, it deals 100 more damage at level 1 (600, where it used to be 500). This means that you are SCARY early game. Second buff is the range. The range is now 950, which is farther than your attack. This means that you can orb walk someone down, then when they're out of your attack range, use finger to get the kill. Generally you don't need too many kills as Lion, but it's very situational. If the opponents have a hero that's hard to kill like SS, QoP, AM, or any hero with a BKB, I'd suggest stealing kills occasionally and going for last hits on towers. The impact that a Lion has on the game versus those heroes is multiplied by 1,000x if you have a blink dagger. Lion's strength is in picking off heroes that rely on skills (blink) or items (BKB) to survive and escape. Spike, hex, and finger basically cut a targets health in half, and give them 6 seconds to survive the incoming burst. Most heroes can't survive that combo.
Items
For most games, you will be laning in the Safe Lane (Bot for radiant, top for dire). You should start with:
- Courier
- Tangos
- Sentry Wards
- 2x Ironwood Branches
If you do not suspect that the opponent will ward your creep camp (Like a
 Dark Seer
 or something), you can get:
- Courier
- Tangos
- Observer Wards
- 3x Ironwood Branches (SICK STATS!)
By the 3:30 minute mark, you should have:
- Upgraded courier
- TP
- Smoke (If you have creep kills)
- Brown boots (If you have hero kills)
Early Game Items
 Bracer
 - Just good all around stats. Some HP and armor. If you're against heroes that can reposition easily with burst damage like
 Storm Spirit
 or
 Clinkz
, stats are needed to survive their initiation. Build this into a drums of endurance later.
 Power Treads
 - If you're against a lot of burst, these help a lot! You can also toggle during
Mana Drain (Next level plays).
 Boots of Speed
 - Sitting on brown boots is risky. I normally sit on brown boots all game if the team doesn't have burst heroes, and I rush a
 Force Staff
 instead.
 Arcane Boots
 - Mana for the team! But this puts you back 1,000 gold. Take that in for a moment. That's the first part of your
Force Staff... It's wards/dust/smokes... Can you really afford to lose 1,000 gold as hard support to give the team extra mana? If you can, grab them, but please be realistic!
 Tranquil Boots
 - If you are roaming a lot, or versus certain spammed skills (Like Nature's Prophet ult).
Middle Game Items
 Mekansm
/
 Pipe of Insight
 - This softens the blow of large AoE damage spells. They trade a spell, only to be negated, and armored added to your allies. Don't pick this item up versus a lot of single target heroes. If your team is
 Ravage
d for example, and you mek, a huge ult's effectiveness is greatly diminished, allowing you to counter attack.
 Heaven's Halberd
 - General rule of thumb: The more passives a hero has, the more this item is necessary. It gives you some survivability, but it's main purpose is to obviously shut down the carry even more than Lion already does.
 Ghost Scepter
 - Again, the more a hero depends on right click, the more of a necessity this item becomes. It's fantastic against heroes who get
 Black King Bar
, as you can just hide in the trees, pop it when discovered, then disable when their BKB charge expires.
 Urn of Shadows
 - Some HP boost, and mana regen. The charges are extremely helpful for sustained push. This is a great item for a Lion player that is constantly moving from lane to lane and getting successful picks. If you're not comfortable with Lion yet, I may not get this. The problem with Urn is that it takes up a slot with an early game item. Your slots fill quickly with boots, wand, TP, wards, sentries, and a smoke. So there isn't a lot of room for items that die off quickly. That is the only downside to Urn, is that it's window of use is small.
Late Game Items
Black King Bar - LOL SRSLY? Yeah, seriously. If you're getting killed by chain stuns before you can get any spells off, go for a BKB. To use the same example, you'd just sit outside of your allies a bit and wait for a
Ravage. When Tide walks in, start right clicking him to get rid of his first
 Kraken Shell
 proc. Pop BKB if he's in position to ult, and burst him down. You can also use BKB to break out of XmtS/Torrent/Boat, Glimpse/Storm/ etc etc... Combos that normally pick off squishy supports.
 Scythe of Vyse
 - Another hex is ALWAYS good. Gives you good damage, mana regen, all stats... The only problem is that it's incredibly expensive. This is literally the END OF THE END OF THE END OF THE GAME item for you. If you get it, you're pretty much done farming. I'd consider this the best item to get for Lion.
 Aghanim's Scepter
 - With the buffs to Lion's ult when combined with Agh's, I feel that this can be a valuable pick up. It can be used in two manners. The first is if you have mana drain maxed, you can push up to a tower, and communicate with your team that you are NOT going to fight with this wave, and finger the support with the large range. Mana drain the ranged creep of that wave. Now with the next wave, your ult is back up and you have full mana again. This puts you at an immediate advantage for the team fight. You can ult a hero other than their support, but it's all situational. The second way you can use this ult is like something with
 Reverse Polarity
 and try to hit several targets at once. It's advisable to use both of these strategies in a single push, but the second one is very situational with your picks. If you don't have a
Reverse Polarity or a
 Vacuum
 then it's obviously going to be very hard to ult several targets at once.
IT'S TIME TO D-D-D-D-DUEL!
 Blink Dagger
 VS.
Force Staff
Blink Dagger - Blink is slightly cheaper, but it is only one item meaning that it is unlikely that it will be a fast pick up unless your team is in a huge lead, or they don't mind lowering the amount of wards up for 8-10 minutes while you farm. With the new mana drain build, a lot of players jungle with Lion when they're not baby sitting. Stacking the pull camp or easy camp and just spamming Q/E on the creeps while pulling. Blink is instantaneous, and if you know the range well it covers a lot of ground. If you blink outside of the maximum range, you will not travel as far, so it is somewhat knowledge dependent. Blink is much easier to use, and allows better positioning. If you want to move exactly 100 units forward, you can do so instantly. Blink dagger disjoints some spells like Vengeful Spirits stun.
Force Staff - Force is more expensive than blink, but the build up allows you to pick up small pieces here and there when you have extra money which will not compromise the safety of any of your players. You can buy TP's, smokes, wards, sentries, dust, all pretty frequently without thinking "Well, only 600 until my dagger..." Force takes a moment to use, and is much more strict with it's movement. If you want to move 100 units forward, TOO BAD. YOU MOVE 600 units. However, blink is temporarily disabled when you're hit while force staff is not. Also, you can use force staff on allies! However, you cannot use it to disjoint projectiles. The push range of 800, is still inferior to a "failed" blink which is 960 (1200 max range)
So who wins?
For most people playing the 5th support position,
Force Staff should be your priority. If you're able to save up for a blink dagger most games, you're not supporting hard enough.
NOPES: (See what I did there?)
dagon - You don't need more burst. You don't need kills. The stats are okay, but this is a "NOPE" kind of item.
 Refresher Orb
 - Have you ever casted Lion's Finger? It costs 1/2 of his mana pool! You can't honestly expect to use this item, can you?
Laning/Timing
Early game
You're primarily attacking the opposing hero and denying. Earth Spike for some extra damage to set the pace for the lane. Let them know that you're aggressive to keep them back, and keep your carry safe. If you're not going to get a kill soon, you can pick up one level of Mana Drain instead of one level of Hex at level 2 for some extra spamming. It's all situational. If you feel that you can get a kill at level 2, get the Hex as I suggest above.
Your first item should be an upgraded courier. After that, get a Town Portal at the side shop. Your next item should be a smoke, then you will most likely have to refresh the wards. If you've gotten a kill you can get brown boots, otherwise they will have to wait.
Once you're level 3-4, it's time to gank middle. Watch your middle lanes creep equilibrium. When it is pushed into the enemy tower, you will want to smoke and leave lane with an allied support hero. By the time you get there, the opposing tower should have pushed the creep equilibrium to your allied middle players hill, leaving the opponent in the river or the bottom of their ramp. You can either go straight into middle from your safe lane, which is risky if you're the radiant. To gank the dire middle from radiant bottom will force you to take tower hits, so you will most likely have to go around to the radiant ancient, then come from above the dire middle ramp. If you're ganking as the dire, strategy goes out the window. Just walk from top (While smoked) and get a kill on the radiant middle.
This is where your Town Portal will come in handy! When you gank middle, your safe lane will think "The carry has no support. I need to go on the carry and try to even out the kills". When you smoke, you NEED to have a Town Portal ready to get back to your lane quickly if necessary. Don't just smoke, let your Phantom Assassin die, and be like "WELP, SORRY. YOU KNEW WE WERE MID BRO. WHY ARE YOU SO FAR UP?" Welcome to support. Leave your farm at the door.
Mid game
Mid game you'll want to continue to smoke mid or their jungle. Lion is probably one of the strongest ganking heroes in the game. Heroes that rely on escape spells are balanced out by being squishy. These are the heroes that Lion needs to keep picking on and keep targeting! Lion falls off late game, as most supports do. The idea is to be aggressive and gain enough momentum through the set backs created by your ganks, so that even their carries cannot actually kill you without trading.
You'll want to start to ward offensively during the mid game. Your ward placement is entirely dependent on your picks, their picks, which towers are weak, and what time you'd like to win by. If you have a hero that needs to farm very hard (Like  Medusa) you'll want to push your own long lane (The opponents short lane). Typically the hard carry will be in your short lane, so pushing their lane only steals their farm. This also means that if they lane pushes out, they will have to walk further into enemy territory for their farm. Lastly, if they choose to defend the push, your short lane should be empty. If you're pushing a T1 tower and they have a good team for defending, go through their jungle and drop a ward behind the tower. If you're pushing their T2, you can still ward behind their tower unless you're on the dire, pushing radiant's bottom T2. This is because you have to reveal yourself to ward their hard camp cliff.
Remember that every time that Finger of Death is up, you need to communicate to your team and get it on cooldown as soon as possible. Assists (or kills) means gold for you, and safety for your carry.
Late game
At this point, Lion is not as viable as he once was. BKB's and other large items will make Lion extremely position dependent. If you have a Blink Dagger or a Force Staff, you're in good shape. If you don't, you need to stay WAY back when team fights are initiated. If you can grab both a blink and force, do it. LION'S NEEDS DAT POSITIONING. If you're against heroes with BKB, I suggest hanging in back, and waiting for the charge to pop. When it does, the hero will go on someone. When they do, push allies to safety with Force Staff, then wait for the charge to wear off and turn it around. Finger targets will usually be supports at this point. Someone with a big ult but no BKB (Like  Crystal Maiden) will make them think twice before using their ult. Even if it doesn't get you a kill, it may have prevented an ult, which still impacts the team fight positively.
Late game is when Lion's repositioning items like blink/force really shines. Blinking into a hex/impale combo can burst down almost any hero with minimal help. As long as you have vision, and can get the jump on carries before they pop BKB, you can win the game with Lion.
Positioning
There are two places you need to really be concerned about your positioning. The first situation is in all team fights. You need to hang back, and judge the heroes positioning and constantly move accordingly. If a carry advances, you retreat. If they retreat, you push forward. If a stun is blown, you push forward and hex to even it out. If no stun is blown, you keep repositioning yourself until the fight is over.
In general you'll want to hex the hero with the highest DPS, to lower the opposing teams DPS as much as possible. Sometimes you'll save hex for a certain channeled ult or something. It's all very dependent. You'll also want to use Finger of Death on the squishiest carry hero available typically. One of the great things about Lion is that he almost always trades up. What I mean by this, is that you can usually spike, hex, and finger before you die. This means they're essentially killing a hero that has nothing else to contribute to the team fight. It's like Earthshaker dropping veil and his whole combo on a team, then the opponents focus the ES instead of the high DPS carry hero.
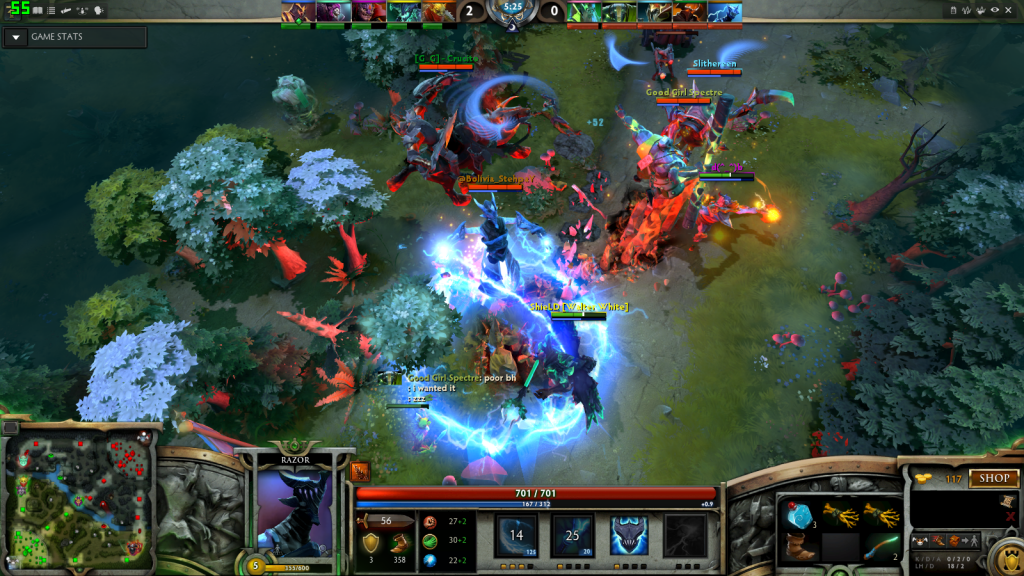
Using Earth Spike well takes a bit of practice and prediction. It's a bit similar to getting steals with Rubick. The spell is readily available, and you can steal any spell at any time. Sometimes you'll just say "hey, a spell!" similar to how you'll say "Hey, an enemy to stun!", but with experience you will learn to become more patient and particular with your stuns. The same thing that separates a good Rubick from a great one, is the same thing that separates Lion players... The three P's: Patience, prediction, and positioning (I just made that up! Pretty slick). You'll want to watch the positioning of opposing heroes and position yourself to stun as many as possible when they are going after another target to maximize the effectiveness of your stun. Here's an example: Below is a picture of myself on Lion, supporting my friend on OD. We are smoke ganked by ES. OD uses astral imprisonment on me to make me dodge a stun. Where would you go after imprisonment wears off?
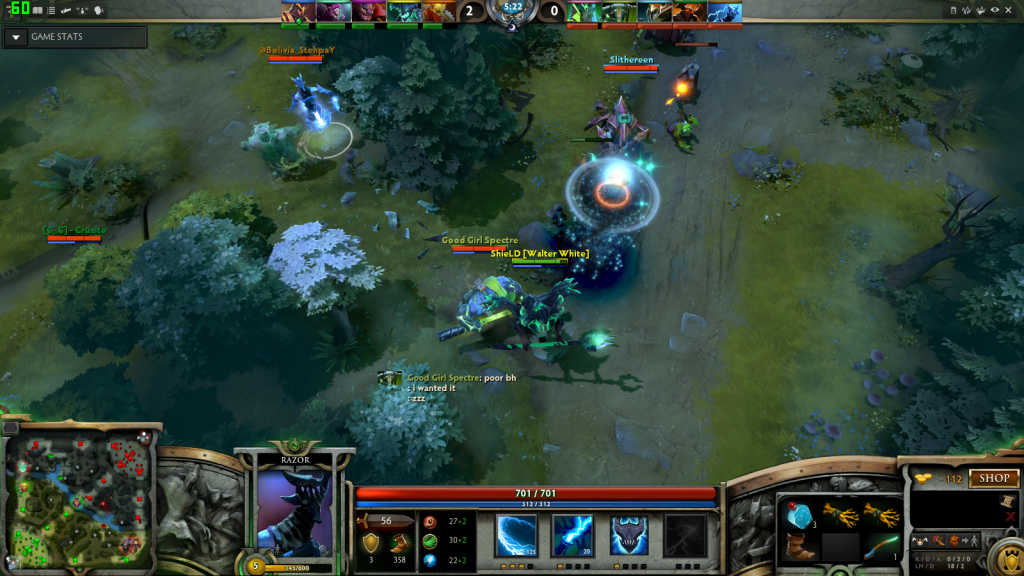
I have about one remaining second in imprisonment. What do you think?
...
I chose to go right. A squishy Lion isn't hard to kill, so they would rather gain ground and go for a double kill. This means they are going to push forward. If they all push forward, and I am to the right, I will be next to all of them, which lines up a stun very well!
Team Battles/Trading up
General Advice
Here are some tips for entering a team battle: First of all, remember the three P's (Positioning, Prediction, and Patience)! Stay far back. The thing about team fights is that I can't tell you how to play each team fight EXACTLY because every game will be different. Sometimes heroes will be caught out, sometimes you'll be up front, sometimes you get initiated on, etc etc... But here are some general things to remember... First of all, like I said, stay back. Lion will die instantly if caught out, and that's no good. Lion is incredibly good at neutralizing initiation. Let's say a  Templar Assassin is looking to initiate with a blink. Ideally she would like to hit a support hero and kill them 1-2 attacks, but that's not going to happen because of your positioning, right? So she jumps on your carry. She has now committed space and cooldowns in an attempt to kill your carry. If you're able to Hex her, she is completely out of position and can be bursted down by the rest of your team very easily. Let friends get jumped on, and your job is to save them with disables or force staff.
Hex/Mana Drain
Typically Hex will be the first spell that you use in a team battle. After that, you can either look for an Earth Spike (If the opponents are pushing into you), or you can Mana Drain a melee hero. Why a melee hero? Because it's hard for them to change targets, and because they have no range, they typically have to commit with a lot of space to successfully participate in team fights. Also most melee heroes have the lowest mana pools, so each second will count more since a larger percentage of their mana pool is drained per second. If it takes Tiny one second to walk into battle, this means when you mana drain him it will take him one second to walk out to break Mana Drain. This means that out of 4 seconds, he has walked into battle for one second, participated for one, walked out for one, and spent another to walk back in. Trust me when I say melee carries are THE MOST efficient targets for Mana Drain 99% of the time.
Finger
Usually you'll want to use finger immediately in a team fight. Finger best used on a hexed target so that your allies can finish them off. Hex, finger, and it's easy clean up for your allies. Fingering a hero that is not hexed means more commitment from your allies to finish the target. That's not good. The less commitment for a kill, the better. Late game, you'll pretty much only be using it on supports (Or carries without BKB if you're lucky). Using finger correctly reminds me of the last part of this section, and my personal favorite thing about playing with Lion:
Trading up!
In most chess games, you will not win without sacrificing pieces. It's no different in DotA. Trading up would be an advantageous trade (Their KotL kills your Lion, but your OD kills their Phantom Assassin), while trading down would be the opposite. In a lot of video games, I tend to lean towards reckless suicidal offensive playstyle. Lion is the KING of trading up. Imagine a team fight. Your team initiates. Let's say you get a 2 man  Black Hole, and you Earth Spike to follow up. Then you sheep the carry and finger him. Storm jumps. You force staff out! Storm grips you, the team follows up and you're killed. Storm has wasted substantial mana to reposition and grip you... and if you used a force staff and were already in good positioning, the opponents must put themselves out of position to kill you.
Let me give you another scenario: Exact same as the last one, but you don't get jumped on. Storm ignores you. What now? Put yourself out of position and bait yourself. Or don't even bait. Just go die. Where's why: Lion has a large impact in team battles, and dying after you blow all of your spells isn't always a bad thing. You've successfully hexed, impaled, and fingered. You're out of spells for a while and probably out of mana. If the opponents cast spells on you, those are spells that will not be cast on your carry. The opposing team will be wasting mana and resources to kill a support hero that has no spells or mana. This... Is a good trade.
BFF's and Not BFF's
Lion is best picked (and usually laned) with heroes that do great damage, but must chase to do that damage. Here are a few examples of
Best Friends!
 Anti-Mage - A hex and impale with AM is very good in lane. Especially if you follow both skills up with a mana drain. A few attacks from AM and a mana drain from Lion will drain almost any heroes mana pool to 0.
 Chaos Knight - Chaos Knight can do HUGE damage if the target stands still, but that usually isn't the case. Without support, CK relies on a long duration Chaos Bolt and luck. With Lion, He can just reality rift, then Lion disables and the CK can finish the hero off.
 Ursa - The king of man fight. No one can withstand a few seconds of swipes from the BEAR! I've done tri lanes with Ursa, Lion, and a random support with long range (Like CM for slow) and it's worked out splendidly in the past. Again, Ursa does HUGE damage, but relies on getting into position followed by his ****py slow. With a Lion, his chasing problems are over!
 Phantom Assassin - If you tri lane with a CM/Lion a hero that is caught out of position can be initiated on IMMEDIATELY. Between PA's dagger, and CM's Q, the range of this lane is very hard to handle, and it's very easy for PA to snowball with good support.
Clinkz - I wouldn't suggest laning the Clinkz with Lion, but you can still pick up Lion as a safe lane support, and send Clinkz as your long lane. Mid game they make a very beastly team. Again: Clinkz relies on positioning with invis, then bursting them down before they can run away. Lion = No running.
A few less popular, but still decent laning partners would be  Riki, Medusa (Land a huge impale during her ult for lifetime commends),
  Shadow Fiend,
  Sven,
Sven,  Spirit Breaker,
  Sniper,
  Morphling.
Mana Drain is also a huge counter to heroes that rely on Linkens as a core item such as  Queen of Pain, Medusa,
  Weaver, or Storm Spirit.
We're Not Best Friends Anymore! >:(
Worst enemies would be anyone that can stop Lion's chain stuns. The main ones to look out for would be  Lifestealer,
  Abaddon,
  Legion Commander,
  Omniknight,
  Dazzle, or
  Slark.
Also any enemies that have illusions built into a skill, or rely on Manta like Chaos Knight, Medusa, Anti-Mage,  Luna, or
  Phantom Lancer can be difficult to deal with, depending on the situation.
The Lion's Heart Beats... No more. :'(
That's going to wrap up my guide! Hopefully you learned from it. I'd love some feedback on it, as I have no idea what I'm doing honestly. I'm just writing my opinion, adding colors, and copy/pasting Dr.D's TA/BBC guides. (All credit to that guy for making this guide extremely easy to make! You're awesome!).
Also some cool pictures and humor. ^_^
Later!
-Angelo


 Animal Courier


Quick Comment (33) View Comments
You need to log in before commenting.