BroodMother - Ultra Adventures - definitive guide Incomplete versao 5 - 27/07/2020
Powerduracell
July 27, 2020
HOW TO USE THIS GUIDE
First of all, dear reader, know that this guide and a complete guide covering different levels of this hero for the same reason is a long and extensive guide and finally a little tiring.
So you should stick to the main topics and look only for what interests you similar to using a game walkthrough
READ THE TOPICS AND SEE WHAT YOU ARE LOOKING FOR
Things you should know

There are lots of good broodmother guides, but the big question is not in your item building and skill, but in your ability to make quick decisions at crucial times.
This hero is all about map control, map recognition, and generally working alone with the team.
A good Broodmother is one that creates map openings for your farm team, the ability to press hard on the opposing team by pushing them to their bases and making them choose bad decisions that can define an entire game.
BroodMother is a hero who works alone, there will be rare occasions when the companion of other lane heroes will benefit you. Remember be polite and ask for the team's understanding to take a lane alone.
BroodMother is a great pusher, but mediocre to defend the base. To succeed with this hero, you player must be extremely aggressive in the first few minutes and be able to set the game before 40 minutes.
In the late game, Brood acts as a semi-carry, and everything will depend solely on what good you managed to farm, and how many finishing items you have for your fortification.
Finally, Playing with BROODMOTHER is being between life and death, the thin line between victory and defeat applies perfectly to this hero. Knowing the right moment to push and back, have the right intuition about staying or moving, have a fixed goal, and be able to adjust as the game needs, understand when there is an opportunity and when there is a trap. Have the ability to measure risks and gains and have the nerves of steel to always be on the edge of your physical and mental abilities.
The 10 Commandments - BroodMother

1 - You will not be foolish, will not let the game pass 30 or 45 minutes if you have a chance.
2 - You will not leave your lane, even if there is a teamfigth, except for exceptions. For more information see section 10.
3 - Worse than being foolish is being dumb and foolish. Never leave your web never, no, no and no, if necessary do it quickly and so that you have 100% security. Yes there are exceptions.
4 - Go ward, "You did not choose the supportive life, the supportive life that chooses you"
5 - Don't be distracted by mundane things, you know that Anti-Mage that doesn't leave the jungle for anything? So, this is what you need, concentration, focus and purpose.
6 - You will not allow yourself to be in defensive situations or trapped inside your base. If it happens see section 11.
7 - Attacking is better than defending.
8 - Be flexible but objective.
9 - Learn a BROODMOTHER LIVE, worth much more than a BROODMOTHER DEAD. Don't be afraid to run away if the situation demands it.
10 - Don't forget, you play alone, but you have a team. You need your team to win the game. This requires minimal coordination from your team.
Pros / Cons
Pros:
+ Able to create snowball.
+ Can hold a lane with 2 and up to 3 heroes.
+ Extremely fast farm, no items required.
+ The best pusher at the beginning of the game.
+ Can kill almost all heroes, and has good skills in a 1x1 fight.
+ High mobility and map domain capability.
+ Has the ability to finish the game quickly.
Cons:
- Depends completely on farm and a snowball.
- Extremely fragile at the beginning of the game, sometimes being the first death.
- Ability to escape is extremely poor depending only on your mobility in the web, if you are ambushed and almost certain to die.
- He is a very good hero at the beginning of the game and in the middle, but falls a lot in late games (depending only on items at the end).
- Counterattacked heavily by some specific heroes, except in public games.
- High domain of micromanagement and map knowledge.
1.1-The Beginning - Choosing the Route

The Broodmother can be played on any road and be successful.
But even with this factor, Brood fares better on hard roads either top or bot.
Mid is not necessarily bad, but you should remember that the only real contribution to your team is that the T1 tower will fall quickly, otherwise your team will be drifting without support or ganks coming from you, the middle T2 tower is easily defended and your farm will be a little bad. Unless you rotate on other roads creating a mid / top or mid / bot pass. Playing mid will require another approach that will be seen later.
It will all depend on the style of game you want to print in the game, and which lane you are most comfortable playing with.
1.2-The Beginning - Dire: bot and Radiant top
These routes are what I classify as the most offensive and also the most dangerous, usually played alone and without a partner / support.
I will classify the most important base points of this route:
Pros:
rapid advance on towers 1 and 2 of the respective route (enemies difficultly defend)
rapid creation of the spider swarm
large gold fee per amount of neutral camp
steals the main farm fields of the enemy team
Cons:
low rate of rotation between different routes
high chance of being ambushed
limited to a specific route with little contribution to the team in the initial / intermediate games without team battles
Note: can be chosen even with a jungle player
1.2-The Beginning - Dire: top and Radiant bot
These routes are what I classify as the most defensive and also the safest, usually played in pairs / support.
I will classify the most important base points of this route:
Pros:
high rate of rotation between different routes
low chance of being ambushed
Connecting point between two routes contributing to the team in the initial / intermediate games with team battles
Cons:
slow advance in towers 1 and 2 of the respective route (enemies easily defend)
slow creation of the spider swarm
lowest gold rate per amount of neutral camp
don't steal the main enemy's farm field
Note: It cannot be chosen with a jungle player
1.3-The Beginning - Dire/Radiant: mid
This is the route that, once chosen, you MUST prevail by all means, there is no excuse, if you cannot win this route, therefore you have an obligation to maintain or create a tie with your opponent in the middle.
Remember that there will be no gank or support from you for your top or bot allies.
You only have one function, which is to bring down Tower-1 as quickly as possible and to be able to spin the enemy's route by pressing them to return to your base.
Pros:
If you prevail, you will win the despair of your opponents
Cons:
If you lose, get ready to win the hate and fury of your own team (why so much hate is just a game I don't understand)
There are no pros or cons, everything will depend only on you.
For more consult the section MID LANE STRATEGIES
2.0-The Hero Skills - Inicial Skills
Now is the time when you must think and choose with extreme care. To start the pattern game, always take the web and the spiders at level 2. From then on you will have 2 options, maximize your webs first or maximize your spiders.
 X
X
A) Maximize spiders - Offensive
For extremely offensive games, increasing farm power and putting heavy pressure on the enemy, but limiting itself to a smaller area of movement in the webs and slower movement speed.
B) Maximize the webs - Defensive
For extremely defensive games increasing power of survival and mobility, in parallel increasing farm power indirectly.
The ideal is that you build the skill according to your perception of the game. I personally always maximize webs and rarely spiders, maximizing spiders is very effective when your opponent doesn't know how to play against you or there are no hard characters in your lane.
In more advanced games against experienced players often small errors or lack of mobility and movement speed will kill you, remember Broodmother's only escape mechanism is in your speed and mobility.
Another point to consider is that experienced players will start targeting their spiders instead of attacking their hero by destroying their swarm before it even starts. For this reason you must supplement with more webs and gain farms in the neutral fields in conjunction with the routes until you are able to have an adequate swarm of spiders.
3.0-The Hero Talents - Inicial Talents
Basically there are only 2 constructions that you can do until you master all the BROOD stems at level 30.
Types of Construction
A) Focused on your spiders
Choose all talents for spider growth
10: +100 Spiderling Damage
15: 15% Cooldown Reduction
20: + 25 dammage Spiderling
25: +350 Spiderling Health
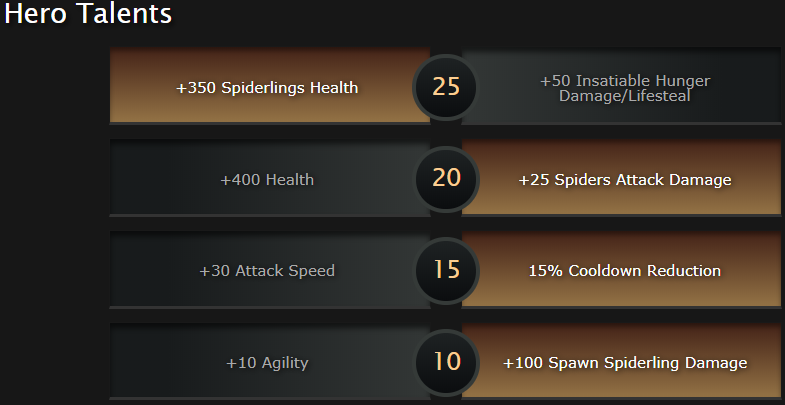
xxxxxxxxxxxxxxxxxxxxxxxxxxxxxxxxxxxxxxxxxxxxxxxxxxxxxxxxxxxxxxxxxxxxxxxxxxxxxxxx
B) Focused on Broodmother
10: +10 Agility
15: +30 Attack Speed
20: + 400 Health
25: +50 Insatiable Hunger Damage / Lifesteal

xxxxxxxxxxxxxxxxxxxxxxxxxxxxxxxxxxxxxxxxxxxxxxxxxxxxxxxxxxxxxxxxxxxxxxxxxxxxxxxx
My Construction
10: +100 Spiderling Damage
15: 15% Cooldown Reduction
20: + 400 Health
25: +50 Insatiable Hunger Damage / Lifesteal

Regardless of the patch and its changes practically and you only have to choose between the skills that will benefit or BROOD or the Spiders will always be that way unless the hero's gameplay changes drastically and only adjust the talents according to the patches.
4.1-Choosing items - Inicial items

Soul Ring
Without question, SOUL RING is your core item, you can even try it with other primary items or consumables, but it is almost certain that it will not work, perhaps in future patches. Do not doubt Soul Ring is the answer

Hand of Midas
This is an extremely situational and highly risky item, it should be closed right after the Ring of the Soul, preferably before 10 minutes. After that time you have to reconsider that old question: Is it worth it? How long will the game last? Will I be able to get the spent gold back?
There are 2 major problems with the Midas Hand
1) Does not offer mana regeneration / reserve
2) Does not directly contribute to pushing or killing your enemies on the route
You only have a role in the game which is to push and create extreme pressure on the enemy team, depending on the Hand of Midas patch it will take 18 to 21 minutes for your return, in a 30 to 40 minute game, for a character like BROODMOTHER this is a long time, closing an advance or killing item, part of the gold and exp won by the death of your enemies or by the farm fields is equal or even higher than HAND OF MIDAS, with the difference that you will be pushing and pressing move them back to the base.
Not that I never used HAND OF MIDAS, on the contrary, I used it a lot, but they were all games in which I knew I would exceed 40 minutes and with little fields of farms and extremely defensive.
Remember commandment 1: You will not be foolish, will not let the game pass 30 or 45 minutes if you have a chance.


Medallion of Courage
This is the point of disagreement, the point of the race between closing an ORQUID or closing an intermediate construction item.
Medallion of Courage and its evolution Solar Crest is not bad, but it is not good, mainly in intermediate and advanced games.
The question to ask is: Who am I going to use? How will I use it? Is it really necessary?
Medallion of Courage will only assist in SOME KILINGS and for SOME HEROES, but he will not disarm or silence his opponents.
Remember: FACE TO EXPERIENCED AND SKILLED PLAYERS Using the Medallion of Courage will only kill the enemy slightly faster than normal or not.
Example: Shadow Fiend
In the golden days of Dota 1 and 2 Shadow Fiend, Zeus, Necropos and others, would be more than food in the hand of Broodmother, but in the current patches each spider has exactly 280 hp without magic resistance, and the smaller spiders without even commenting, taking taking into account that most heroes have magic or area skills, and that a good part of them do about 250 to 300 damage and that a Shadow razer does 300 damage, just a single blow to sweep your entire spider swarm .
Example: Zeus and Necropos
These guys will cause you a big headache because as I said, experienced and skilled players will start targeting your spiders by reducing their swarm before you can ambush them properly.
Easy enemies that become difficult without ORQUID:
A) Storm Spirit: Ult and he will leave and if you are not careful he will kill your spiders and you together.
B) Bount Hunter and invisible characters: unless you wanted to spend on dust and sentry.
C) EarthShaker: Nothing to comment so try and find out to see what happens.
Another point to be taken into account is that the same item that helps you to kill also helps you to die, is a double-edged sword.
Some players knowing this will start to create false situations for you to advance and then ambush to kill with less defense.
Using MEDALlION OF COURAGE may work or it may not.
Think well sometimes the cheap is expensive. Why doubt if you can be sure.

Orchid Malevolence
Orchid Malevolence is all you need, it provides mana regeneration, mana reserve, damage, attack speed and evolves into BloodThorn, but it has a problem: it is expensive.
This is the main reason why many players avoid closing ORQUID, but it is not because it is expensive that you should not close.
With a little training and even in difficult conditions it is possible to close before 15 minutes.
Your ORQUID, is the BatlleFury of Anti-Mage, the Radience of Alquimist, is expensive but worth it.
For a quick comparison with the value of Medallion of Courage
it is possible to buy 2 Sage Mask and 1 Robe of Mage, it is not good, but it is enough of reserve and mana regeneration to be able to farm safely.
By closing ORQUID you will pressure your opponents to play further back and make them spend on things that they usually would not spend.
Many games I won were due to ORQUID, but feel free to test both constructions.
But I must repeat: why doubt if you can be sure.
4.2-Choosing items - intermediary items
VERY ATTENTION
If you have made it this far then it is time to set priorities the next items should be closed according to your current situation.


A) Desolator
B) Black King Bar
C) Aghanim Scepter's
xxxxxxxxxxxxxxxxxxxxxxxxxxxxxxxxxxxxxxxxxxxxxxxxxxxxxxxxxxxxxxxxx
A) Desolator
If you are late or having trouble taking down Tower-2, you are ambushed rarely and need an item with medium price and damage, get desolator this will help you a lot.
B) Black King Bar
If you are frequently ambushed and are knocked down with many stunning spells or impeding your movement. Take BKB and a tip: don't be afraid to spend if the situation requires it.
Remember commandment 9: A living BROOD is worth more than a dead BROOD.
C) Aghanim Scepter
And what can I say about this item?
This item is one of the best things that ever happened to our poor spider, and look, I’ve been following it since Dota 1.
The Blessing of the Gods is everything you need.
This item is one of those items that you have no doubt YOU SHOULD HAVE.
It gives you 10 more webs to use, increases movement speed, removes the maximum speed limit.
AGHANIM will give you more power to push, the ability to move forward and back, survival and more neutral fields to farm.
Without a doubt it is your 3 or 4 most important item with BKB, between BKB and AGHANIM choose AGHAHIM.
Obviously, the ideal is to have both, there will come a time when BKB will be necessary, but until that moment arrives choose Aghanim.
5.1-Managing webs - Things you should know
Yes I have to reinforce how big Aghanim Scepter is.
I don't want to force you dear player to use Aghanim Scepter just because I like it, but I want you to be fully aware of why you should get AGHANIM.
If you, my dear reader, are a true lover of BROODMOTHER and perhaps a lover of all arachnids, you will understand that there comes a time when you simply cannot push any more, do you know why?
Simple web is missing or there are not enough webs.
Just as you know that you are going to use webs to push, you know that you must have at least 2 or 3 webs in reserve for possible ambushes on enemy teams or for escape situations where YOU ARE AMBUSHED, with it comes a time when you will find yourself in a situation where you can’t push anymore and can’t get any more neutral fields because you’ve already consumed everything you had.
Another factor that you will notice over time is that you are ambushed very easily, do you know why?
Simple is because the construction of your webs is practically linear with only 1 or 2 transition points when I say linear does not mean a straight line but that the points connect as a tunnel as a single track where only 1 car can pass or come back.
Always repeating EXPERIENCED PLAYERS AND WITH CERTAIN KNOWLEDGE OF YOUR HERO, they will start a scan behind you.
As the webs have the construction of a tunnel it is easy to predict where you will be or where you will be positioned depending on the situation, however with 10 more webs the search radius becomes too big for them to find you and you will be able to create more 3 or 4 connection points for pushing, backing and farming.
And I hope you know that if the enemy team is hunting you very often, as if they were with arachnophobia then know that it will not be a BKB that will save you, when that happens no matter where you go, they will hunt you down to hell I've seen cases where a team deforested half of the Amazon rainforest just to knock me down others even use ult that work on BKB's or sometimes a SKULL BASHER works when invoking a tp, know that it will have complicated days.
This is the reason why I prefer AGHANIM to BKB as a 3 core item because the best way to survive is simply not to be there.
5.2-Managing webs - Things you should know 2
8 webs at the beginning of the game and more than enough, the real problem starts after the fall of Tower 1 managing your webs and more than an obligation is a duty, each web must be calculated with the maximum effort always creating a connection.
Observation and practice is what will allow you to know how and where to position each web with maximum efficiency and mobility
The Juggernaut said:
"With practice comes strength".
6.0-5 rules of good web etiquette

1) Do not create webs without connection or totally disconnected (small / large spaces between them).
Do you want to run on the express track without delay and speed crashes or collisions? So NEVER create webs that are not connected or that do not have a connection with each other, no matter how small the physical space between the webs.
Many create this space because they lack webs or because they think that this small gap will not cause them any, but it is precisely this small space that will kill you either by colliding with an ally / enemy or by placing your spiders in front and spontaneously locking between them or fleeing from a chase at 100 an hour and suddenly dropping to 10 an hour with each change of web.
If you do that.
Then remember commandment 3 and a look.
2) Always save web for an eventual escape.
Many players simply forget that, at some point in the game, they will be hunted or are so preoccupied with pushing that it doesn't even come to mind that they need to run for their lives.
Be aggressive, but don't be silly. A LIVE BROOD is worth more than a dead BROOD.
3) Always erase the older or useless web.
Because? One day you reader will discover that in a chase or a frantic escape you will inadvertently discover that that web you were counting on the map, simply disappear at the worst or best time of the action, all because you did not manage the newer webs with the older webs or removing those that are not very useful. DO NOT BE LAZY DO WHAT SHOULD BE DONE.
6.2-Heroes Friends/Enemy
AXE
POOL
MICKEY
KILLING FLOOR
7.0-Tactics and Strategies
7.0-Tactics and Strategies - Basic
s
7.0-Tactics and Strategies: Late game
If you got here, there can only be 2 possibilities:
A) You are well fed, and with almost all finishing items.
B) You have only a soul ring and a mediocre boot and maybe an Orchid or Aghanim (or even worse).
Here I will explain how to behave in the 2 cases mentioned.
7.1-Tactics and Strategies: Late game - GOOD
Come on first, notice how well farmed you are.
Then check with Aghanim Scpeter (did I say how important this is?).
If so then keep in mind that YOU BROODMOTHER is an essential part of the team and as such, your presence is invaluable.
Then stop pushing unless you can reconcile the two. Be with your team and push the road, know that if your team dies or loses a team fight the opposing team will only force a road to your DIRE / RADIANT and you will not be able to defend alone, in these types of super games arrears it is essential to avoid unnecessary confrontations especially if they are at a disadvantage, in which case you are missing.
If you have the opportunity to push and force, always be on the alert always check the minimap because if before your death was a crime now your death is unforgivable DO NOT DIE unless you have a buyback.
With Aghanim you will have the mobility to accompany your team, together you will have to have travel boots + if you want to push and be present with the team, but to be honest, do not go too far, do not be that Anti-Mage that always arrives at the end the fight to just hit 1 and run or use the ult and blink to never be seen again.
You should only push if by chance the roads are advanced and always 2 roads never 1 alone, on one road BRODDMOTHER IN OTHER YOUR SPIDERS creating pressure to divide the opposing team is valid, but always be cautious.
If you are defending, do not leave the base if your team is in a defensive situation you have to stay and fight and defend, your individual strength is one of the reasons why the opposing team has not forced a fight yet.
Only try to farm if you urgently need to close a very important item like a BKB, Satanic, Butterfly or whatever else you think is necessary.
There is no secret in games so you must be patient to wait for the enemy to slip. Wait for the right moment to create a space between the enemy team and your teammates and the advance of the roads
here you must use your intuition and know when to advance aggressively and aim directly at enemy T3 or barracks.
When you move forward make sure the enemy has already used the fortification, start using the ULT, the objective and cause as much damage as possible if you realized that they are going to teleport away, if you think you can take down first activate BKB and then run it will need a count very good between the duration of the BKB and the time left to escape if you think it is too dangerous to just run.
Warn your team not to force a total fight, as you will have spent ULT and BKB just wait for the cooldown.
Every opportunity must be seized, do not waste any chance because as said it is about a game of waiting for the opponent's mistakes at some point the enemy team is overcome by anxiety and seeing that they cannot stop the micro-damage to the tower
make them rush to ambush you. Map awareness only lures them towards their allies by forcing to start a disadvantaged team fight.
Applying this strategy little by little you will be forcing the enemy team to retreat always attacking and retreating in two routes. If you see an imminent confrontation come back and fight with the team.
Never think that you are strong enough to take the rival team, Broodmother is strong if well farmed, yet it lacks that push to make it a real carry and that is why Brood is considered a semi-carry.
Be smart don't be silly.
That's how a good BroodMother should act, alone on the roads, but always in tune with the team.
7.2-Tactics and Strategies: Late game - BAD
> ATTENTION !!!!!!!!!!!!!!!!!!
For this strategy to work or the only necessary requirement and a medium functional team, which still tries to seek victory.
Otherwise just accept defeat and try to do it better in the next game.
I will be sincere and direct on this point.
With my experience and with several games in this type of situation, I can say that the defeat is almost certain.
Your winning rate here, and almost 0% maybe 2 or 3%, it is actually a miracle that you have endured so long, if you got here and because a lot, but a lot has gone wrong.
Including bad start of game, bad teammates, wrong construction, mistakes in the strategy employed, lack of employment, obesity, coronavirus and etc.
However, you still haven't given up and believe that you can still turn the tide (or not).
Well before I need you to have 2 things in mind:
1) Forget Defense - Just Attack
Broodmother without items is the worst thing that can happen and the same situation as an anti mage without an item or a Specter with only boots.
But then you will ask, if I leave my team will have 1 less and we will lose. My friend at this point in the championships everything is already lost you stay at the base or leave it will not influence anything it will for me I know, the difference is that leaving the base you are still looking for victory instead of just sitting and watching the defeat .
For that reason you only have 1 option left, to advance in lanes.
Yes, as much as everything is lost, you may even find it strange to try to advance the lanes in this situation, but all that remains to be done with a small difference in relation to other heroes, Broodmother allows you to advance a lane with relative "safety", 8 webs well placed will make it possible to contain the opponent's advance a little in at least 1 lane.
All of this assuming that the enemy team cannot force a direct attack on your base or are afraid of attempting a direct confrontation or because you have an EXPERIENCED TECHIS on your team OR a WELL PHARMED SNIPER that prevent a direct approach from the enemy team or by any reason the game is not over yet
otherwise it would have ended a long time ago and there would be no topic to be discussed.
2) Aghanim Scepter
Yes, if you haven't closed that item yet, please close it. Because if you survived until now and managed to withstand the successive invasions, then it is necessary for you to start pushing seriously from now on.
I'll explain in detail: your real role here is not to push, but to buy time for your team to breathe, and accumulate a little more gold. You will be the bait / decoy that will attract the attention of the enemy team even if it is only 1 member of the rival team, it is already a great advance, because in this situation you Broodmother is so weak and even maybe weaker than the enemy's support, then any change of direction is a victory.
When executing this strategy, the enemy team will notice that one of the routes is being pushed, with that it becomes retaliation, at that time you will need to use all the cunning to push, survive, farm and distract the opponent at the same time.
Yes, it will require all your skill, of course I am assuming you are a master at Broodmother otherwise there is nothing to be done.
STRATEGY
The moment of truth has finally arrived.
With these two things in mind, let's get down to business.
At this point, you need to create enough webs to move forward and backward.
Create webs close to the edge of the map between trees and route.
The advance will take place in the first creppy near the base when the creppy get too far you will have to jump one of the waves and cut off the supply of creppy near the enemy base, a similar strategy and exactly the same thing that the AXE applies to the routes at the base of the enemy, if you’ve ever faced or used the AXE you’ll understand what I’m saying.
The enemy when he realizes that he is being pushed, will hunt him down, with 1 or 2 heroes will move to track you and kill him, so when cutting 1 or 2 creepy waves near the base you now have to quickly retreat, and come back near your base on the way try to farm a little in the jungle if you can, but not too much.
REMEMBER DO NOT WASTE TIME, TIME IS CRUCIAL NOW any mistake and you will be killed and game over.
When coming back near the base try to farm in the jungle on the side of your map (if the enemy team did not catch) then repeat the same process several times. Always remembering to avoid any kind of confrontation.
DO NOT FIGHT, remember YOUR REAL FUNCTION IS TO BE A DISTRACTION TO GAIN TIME FOR YOUR TEAM.
If you managed to execute this strategy, it is now that things get more complicated (in other words, you were already in trouble, now it got worse, only to get even worse, just as ugliness goes hand in hand with the lack of beauty.)
When the enemy team realizes that 1 or 2 heroes are not enough to catch him, then prepare yourself because that is the point that the whole team turns to ambush him.
Here at that time you will need some items to escape and survive and continue to execute this strategy
A) BLACK KING BAR
B) SILVER EDGE
C) TRAVEL BOOTS (Yes, it will take more speed to escape)
D) LINK SPHERE (Situational depending on the opponent's skills)
E) AEON DISK
F) ILLUSORY AX
G) GEM OF TRUTH (Situational)
The idea is about distracting or avoiding combat, evasion, stealth, invisibility, movement speed, dissipation of negative buffs is what you need to survive and escape, plus your intuition and control of the hero.
Now the idea is no longer to push, but to buy time for your team, the chase will be relentless and cruel. Now you must run and hide and leave only when the opportunity arises.
Silver edge will be necessary, you will have to activate it before the team ambushes you, the silver edge will help you to hide, now all you have left and wait for the right opportunity to appear and continue the distraction serving as bait.
However, make no mistake, soon you will see someone with dust and gem so you will need a BKB or LINK or AEON + SILVER EDGE to escape and reposition yourself.
GEM OF THE TRUTH will be necessary to destroy enemy wards at some vital point of view. Revealing sentinel will not be very useful because if the enemy is smart he will position the wards so that you will spend precious seconds trying to locate them and in an escape or eventual ambush you will not have time to try to locate them by luck. Then GEM OF THE TRUTH will be necessary.
If you succeed in this endeavor (which would mean that you may be a BROODMOTHER god or a PRO-Player)
the opponent will begin to disperse and attempt a direct attack on your base, either by frustration or impatience.
At that moment, go back to the base and start preparing for a probable last team fight and pray that your team has farmed enough including you to be able to win or hold this fight.
The strategy is "simple", but difficult to be implemented so practice a lot.
Certainly you will not be able to perform all that I have described, but it will serve as a basis to slightly increase your chances of winning.
First spider swarm
The biggest problem for players is in creating their first swarm of spiders. For that, here are some techniques that, if executed, will help you to create your first swarm quickly and safely.
NOTE: Such techniques apply to bot / top routes.
1) Let the first creepy of the enemy route advance. (It only works on the first wave).
a) Not "holding" or "locking" (standing in front of them to delay their movement) the first creepy of the game.
b) Hold only a portion of the creepy and leave only two or one creepy difference from the group. (or just having an advanced creepy from the rest of the group).
EXPLANATION: when doing this the first creepy will die faster than the rest of the group, so when the other half arrives they will already be at a disadvantage, consequently dying faster.
The big question you are asking yourself is: why should I do this? Right ?
Simple, it is because you do not have your ability to create spiders, the real game of Brood only starts after you reach level 2, meanwhile you will only serve as a punching bag for the opponent's support or your core, and yet on top it will neither farm nor deny the opponent's creepy in other words, YOU DO NOTHING WITHOUT LEVEL 2.
So by letting the enemy push your creepy and delaying yours, it is because the opponent's creepy will accumulate arriving under your turret, this is the moment when you player must create your first swarm, as the enemy will be under from the tower he will not try to deny the creepy or attack his spiders much less attack the tower for being at low level.
Obviously, just before the first wave / second arrives at the tower, you must have at least 1 or 2 spiders to work more efficiently.
2) "Attract" the creepy from the enemy route.
And call the attention or focus of the creepy when trying to hit the enemy's hero.
The Broodmother on the route is fragile and easily focused by the opponent and hardly makes the last attack. After level 2, you will have to attract the opponent's creepy in order to safely create your swarm and take advantage of every opportunity!
8.0-Competitivve game-RANKED
AQUI
8.0-Competitivve game-RANKED: Convincing your companions why they should choose BROODMOTHER
Estamos vivendo ou apenas existindo ?


 Ring of Regen


Quick Comment (1) View Comments
You need to log in before commenting.