Treant Protector - Global Support
Sando
January 20, 2014
Introduction
There are very few heroes who can provide a genuine heal for their allies, and even fewer that can provide two. How about the ability to heal allies anywhere on the map? Or even heal damaged buildings? How about the ability to turn your allies invisible for up to a minute?
If this sounds too good to be true, you need to play some more  Treant Protector :)
He's an extremely well rounded hero who can fill multiple roles on the team - support, initiator and even carry if necessary. You can put him in almost any lane, where his survivability and high base damage will make him competitive. This guide will take a look at how to get the best out of him...
Pros and Cons
+ Very high starting strength and gain
+ Very high base damage
+ Global healing ability
+ Good teamfight powers
+ Invisibility for self and allies
+ Not very item dependent
- Mana issues early on
- Poor base armour
- Lacks a genuine stun
- Has only 1 damage causing ability
- Melee range is more difficult if playing support
Leech Seed

Leech Seed is your primary aggressive skill, especially during the laning phase. It's a nuke with a good slow attached, but it also doubles up as a healing spell.
When you cast it, the target will be slowed and "pulse" 6 times over 4.5 seconds. Every pulse causes damage to the target and also heals every allied unit within 500 radius. Even if the target dies, nearby allies will continue to be healed for the full amount.
The overall damage/heal is pretty good at 144/216/288/360, and provides both a great ganking and counter-ganking ability. Enemy units engaged will be both damaged, and healing the person they're attacking - making it very possible to completely turn around fights.
Obviously it also has potential for team fights (it's very effective early on but does lose power later), as one good Leech Seed can be healing your entire team for up to 1800 hp. It's also quite a good pushing spell, healing nearby creeps and allies. Finally, it has potential against invisible heroes - as you'll be able to work out their position while they're under its effect.
There are some negatives however. It's very mana intensive for a strength hero, which means you're not going to be able to use it except when absolutely necessary to secure or prevent a kill. Sometimes when randoming an supporting an easy lane you might even get a  Soul Ring to power it and
  Living Armor.
Secondly, it works best when either your opposition or ally are melee - ranged heroes won't necessarily be close enough to each other to truly benefit.
Living Armor
Living Armor is the usual reason that Treant Protector is picked. Although it has been nerfed and altered a few times, it's still a unique and effective spell. It allows you to heal and protect any allied unit or structure, anywhere on the map.
It provides a block like  Stout Shield, except that it also blocks damage from any source, including spells. It also continually regenerates health for the target, either until 7 instances of damage have been inflicted, or the duration runs out. The total heal provided is 60/105/150/195, as long as the target isn't attacked more than 6 times in 15 seconds.
On the flip side, at level 4 each instance will block 80 damage, so you could prevent up to 560 damage - great for tower diving!
The most important use of this spell is to save allies in dangerous positions - especially early on, and the damage block can be enough to completely negate attacks, allowing them to escape otherwise impossible situations. Next, you can use it to keep allied heroes topped up, reducing their consumable dependence, or helping them stay in lane against difficult opponents.
The big issue with this is that some team mates can take it for granted - "hey we've got a Treant Protector, I don't need any tangos" - or play stupidly because them think you're there purely to empty your mana pool healing them. At 50 mana a pop and with a relatively small pool, you have to be selective about how much you use this. 50 mana to heal a small amount of health really isn't worth it if you're having to buy  Clarity potions.
Later on, when your mana problems have been minimised, you can afford to pretty much spam it constantly to help your team out. However, be aware of the cooldown, as you don't want to have wasted it on relatively modest healing and then not have it available when somebody really needs it.
And whatever you do, once you've got it maxed, use it to heal and protect your buildings. It can almost a mini-glyph to allow a deny on a building, minimise a push, or heal it up. By constant use you should be able to keep your towers fully healthy. This is especially useful against "slow pushes" that try to wear them down, but makes little difference against aggressive 5 man pushes.
Overgrowth

Overgrowth is your ultimate, a strong AOE "disable" with a relatively short cooldown. It's a slightly odd spell, as it's not a true disable, but does provide several other effects to help compensate. It has a very short cooldown time of 70 seconds compared to abilities like 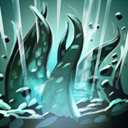 Ravage and
  Black Hole. This means you can legitimately use it for ganking as well as team fights.
It prevents enemies from moving or attacking, but not from casting or using items. It works against magic immune units, but units who become magic immune after Overgrowth is cast will ignore it's effects. Also, units cannot become invisible, and cannot use movement abilities like  Blink and
  Leap - although
  Phantom Strike still works. Units cannot use transformation spells like
  Chemical Rage, Flesh Golum and
  Shadow Dance.
As you can see, there's quite a lot to take in there. The main take away from it is to try to cast it AFTER heroes have used their  Black King Bar's if at all possible during team fights, and to cast it quickly if ganking against heroes like
  Alchemist and
  Anti-Mage.
Usage is sometimes tricky - the radius is centered entirely on Treant, so you need to be right in the middle of the enemy team to use it to best effect. This means either running straight in, sneaking by using  Nature's Guise (if possible) or getting some initiation equipment like a
  Blink Dagger or
  Force Staff. Really this depends on your role - are you the only initiator on the team?
Like all AOE disables, Overgrowth is useful all game, but does rely on allies being present to deal damage and chain other abilities from it.
Roles
As you can see from all the different builds at the top, Treant Protector is a pretty flexible hero who can play most roles effectively. Some people even use him as a jungler, but his farming speed isn't brilliant and your team loses most of the benefits of Living Armor early on.
Support:
This is probably his most common role in higher level games, and his ability to get by with minimal farm makes it an obvious fit. Generally you'd put him in a safe trilane where he can grab a bit of jungle farm and keep an eye on the health of allies, or in an offlane duo where he can protect his partner and pressure the enemy carry.
While not especially farm dependent, Treant is quite level dependent, as his abilities all become much better and no more expensive as he levels up. Buy utility items (especially auras) for your team, and initiation equipment if necessary.
You can play both the #4 and #5 roles, although you should probably be #4 if you're expected to initiate.
Offlane Solo:
Your tankiness and defensive abilities make you a viable offlaner. With your high base damage it's quite possible to outhit opponents, but against most enemy lanes you'll be harassed pretty hard if you try to compete away from your tower. The main thing is that you'll gain levels quickly, allowing you to help your team out and then get involved elsewhere.
Carry/Semi-carry:
First up, despite very high strength gain and ok agility gain, you're not really a proper carry - mainly due to your lack of passives. However, Treant Protector can make a viable semi-carry, weighing in with major damage in the early-mid game. Get some extra attack speed on him and he can be pretty scary.
Bear in mind that it's pretty unusual to play this as a safe lane carry, and you'd usually have a pretty specific (and unusual) plan in mind, or you'd be playing as a #2 carry to back up a harder one. You need to be aggressive, get kills and push hard - don't just sit back and farm too much.
When to Pick Him
Treant Protector is quite a situational pickup, but can work with a variety of setups. He provides defensive utility for your whole team, which can double up into letting your gankers try some pretty risky maneuvers and tower dives.
He provides some good team fight ability/initiation and can be handy for ganking heroes with strong escapes, especially in the woods. His high base damage can make him difficult to lane against, provided the opposition don't have enough right click power to force you away.
This is probably the most important issue - ideally you want Treant to be active in his lane, denying friendly creeps with his ridiculously high base damage and making it almost impossible for the enemy to farm. Anyone trying to trade hits with you will swiftly regret it. If the opposition can keep him away from the keep line, they'll have a much easier time.
Ideally he wants a ranged partner in dual lanes, even better if they have a stun and/or other means for being aggressive. In trilanes you usually want a ranged support and a melee carry.
Skill Builds
I've given you a nice variety of builds at the top, and you can see that generally you'll want to max either Leech Seed or Living Armor first, as they are most beneficial early game, and also drop off the quickest. Levelling either makes no difference to the mana cost, so there is no downside whatsoever.
The only real question here is how aggressive you expect to be in your lane - i.e. is there a good chance that you'll kill your opponent(s) if you do? If so then you'll concentrate on Leech Seed to get maximum value from your only aggressive ability. It's VERY expensive for you, so won't get too many chances to use it without adding more mana regeneration.
Being a melee hero who wants to be close to the creep line, using Clarity potions is problematic as you have to more away or have them denied in short order. This is why  Ring of Basilius is so important for you.
Maxing Living Armor is more of a default build, and you can rarely go too far wrong with this one. The main thing is not to use it outside critical situations (securing/denying a kill) until you've got at least a few levels into it. As you can see, all of our builds have at least 2 points into it by level 4.
Nature's Guise is more contentious and tricky to decide when to level. Many people are completely against it, maintaining that you need to put maximum points into your other skills first, and saying how easy it is to counter.
However, I don't think you should be closed minded about when to skill this. It can save both you and lane partners if used correctly. As it's rarely skilled and rarely used properly many players simply forget about - they're unlikely to buy  Sentry Ward or
  Dust of Appearance like they would if you were playing against
  Bounty Hunter - at least until you've dodged a gank or two :). This also forces some of their players to buy detection equipment at a time when their gold will be most stretched.
The other issue is that the skill starts out being expensive, and becomes cheaper as you level it. This makes it a bit tricky, as you really want 2 points in it to make it a bit easier to afford and to double that duration up. Still, I would consider it strongly for very dangerous laning situations, and if your team is being outganked.
Situational Items


The first two items here are primarily used for initiating, especially if you don't have other heroes on the team to do it. Although you have Nature's Guise to help you here, it isn't suitable for all situations, and enemy teams can and will come to expect it and take appropriate counter-measures.
Of the two you have the usual choice between the exact placement and range of Blink Dagger, versus the better escape and stats of Force Staff. As a general rule, I'd pick up the dagger as you already have a lot of escape potential, and the placement of the dagger will allow for better Overgrowth usage.
The Orb of Venom is only a cheap little item, but potentially handy for the extra harassment/slow it applies when you hit. Can help secure kills against enemies without proper escapes.
Heaven't Halberd is a much more expensive item, but also very useful against farmed up carries in the late game. It lets you tank better and more importantly, disarm them temporarily.
Finally, Blade Mail. Such a great item on Treant, it gives you armour, damage and intelligence on a pretty cheap item. More importantly, it allows you to return damage you receive to the enemy that dealt it. You've got plenty of HP, so you can make killing you pretty painful.


 Animal Courier


Quick Comment (8) View Comments
You need to log in before commenting.